在混合开发模式下进行调试
当你将 Flutter 模块集成到项目中并使用 Flutter 的平台 APIs 来运行 Flutter 引擎和/或 UI 时,你可以与平时运行 Android 或 iOS 应用程序一样,构建和运行你的应用。
但就目前而言,Flutter 需要在 FlutterActivity 或 FlutterViewController 中展示 UI 内容。
调试
你可能习惯于在 IDE 中运行 flutter run 或者等效的快捷命令,它会自动启动你喜爱的 Flutter 调试工具。同样的,你也可以使用所有 Flutter 的 调试功能,例如热重载、性能调试、DevTools 以及在混合开发的场景中设置断点。
这些功能由 flutter attach 机制提供。
flutter attach 可以通过不同的路径启动,例如通过 SDK 中的命令行工具、VS Code 或者 IntelliJ/Android Studio。
flutter attach 可以在你运行 FlutterEngine 时立即进行连接,并在 FlutterEngine 被释放之前一直保持连接。你可以在启动引擎之前执行 flutter attach,它将等待下一个由引擎持有的 Dart VM 进行连接。
终端
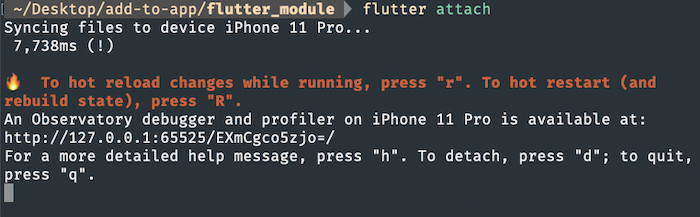
在终端执行 flutter attach 或者 flutter attach -d deviceId 来连接你的应用。
VS Code
Build the iOS version of the Flutter app in the Terminal
To generate the needed iOS platform dependencies,
run the flutter build command.
flutter build ios --config-only --no-codesign --debug
Warning: Building for device with codesigning disabled. You will have to manually codesign before deploying to device.
Building com.example.myApp for device (ios)...
Start debugging with VS Code first
If you use VS Code to debug most of your code, start with this section.
Start the Dart debugger in VS Code
-
To open the Flutter app directory, go to File > Open Folder… and choose the
my_appdirectory. -
Open the
lib/main.dartfile. -
If you can build an app for more than one device, you must select the device first.
Go to View > Command Palette…
You can also press Ctrl / Cmd + Shift + P.
-
Type
flutter select. -
Click the Flutter: Select Device command.
-
Choose your target device.
-
Click the debug icon (
 ).
This opens the Debug pane and launches the app.
Wait for the app to launch on the device and for the debug pane to
indicate Connected.
The debugger takes longer to launch the first time.
Subsequent launches start faster.
).
This opens the Debug pane and launches the app.
Wait for the app to launch on the device and for the debug pane to
indicate Connected.
The debugger takes longer to launch the first time.
Subsequent launches start faster.This Flutter app contains two buttons:
- Launch in browser: This button opens this page in the default browser of your device.
- Launch in app: This button opens this page within your app. This button only works for iOS or Android. Desktop apps launch a browser.
Attach to the Flutter process in Xcode
-
To attach to the Flutter app, go to Debug > Attach to Process > Runner.
Runner should be at the top of the Attach to Process menu under the Likely Targets heading.
Start debugging with Xcode first
If you use Xcode to debug most of your code, start with this section.
Start the Xcode debugger
-
Open
ios/Runner.xcworkspacefrom your Flutter app directory. -
Select the correct device using the Scheme menu in the toolbar.
If you have no preference, choose iPhone Pro 14.
-
Run this Runner as a normal app in Xcode.
When the run completes, the Debug area at the bottom of Xcode displays a message with the Dart VM service URI. It resembles the following response:
2023-07-12 14:55:39.966191-0500 Runner[58361:53017145] flutter: The Dart VM service is listening on http://127.0.0.1:50642/00wEOvfyff8=/ -
Copy the Dart VM service URI.
Attach to the Dart VM in VS Code
-
To open the command palette, go to View > Command Palette…
You can also press Cmd + Shift + P.
-
Type
debug. -
Click the Debug: Attach to Flutter on Device command.
-
In the Paste an VM Service URI box, paste the URI you copied from Xcode and press Enter.
You can also create a .vscode/launch.json file in your Flutter module project.
This enables you to attach using the Run > Start Debugging command or F5:
{
  name: "Flutter: Attach",
  request: "attach",
  type: "dart",
}
IntelliJ / Android Studio
选择要运行 Flutter 模块的设备,然后点击右边的 flutter attach 按钮。

Wireless debugging
You can debug your app wirelessly on an iOS or Android device
using flutter attach.
iOS
On iOS, you must follow the steps below:
-
Ensure that your device is wirelessly connected to Xcode as described in the iOS setup guide.
-
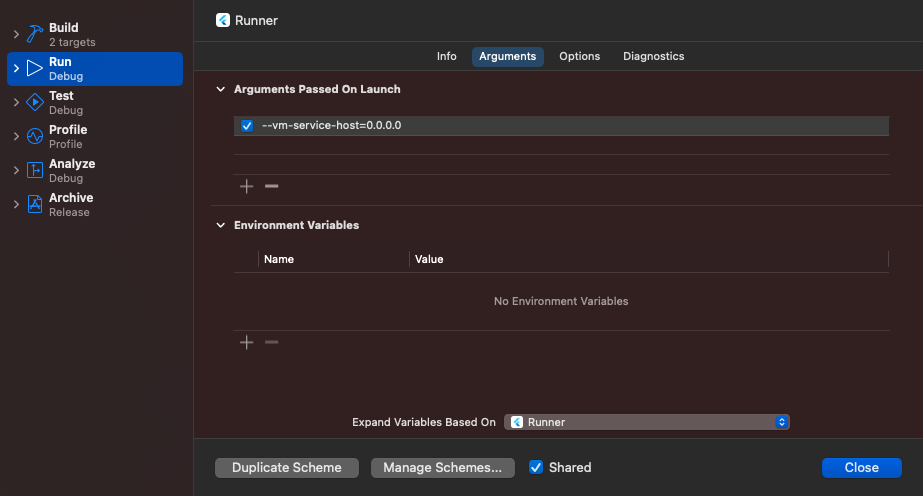
Open Xcode > Product > Scheme > Edit Scheme
-
Select the Arguments tab
-
Add either
--vm-service-host=0.0.0.0for IPv4, or--vm-service-host=::0for IPv6 as a launch argumentYou can determine if you’re on an IPv6 network by opening your Mac’s Settings > Wi-Fi > Details (of the network you’re connected to) > TCP/IP and check to see if there is an IPv6 address section.
Android
Ensure that your device is wirelessly connected to Android Studio as described in the Android setup guide.