在屏幕上添加一个 drawer
在 Material Design 设计准则里,主要提供了两种导航方式:Tab 和 Drawer。当没有足够的空间来支持 tab 导航时,drawer 提供了另一个方便的选择。
在 Flutter中,我们可以将 Drawer widget 与 Scaffold 结合使用来创建一个具有 Material Design 风格的 Drawer 布局。请参见如下的步骤:
-
创建一个
Scaffold。 -
添加一个 drawer。
-
向 drawer 中添加内容。
-
通过代码关闭 drawer。
1. 创建一个 Scaffold
为了向应用中添加一个 Drawer,我们需要将其放在 Scaffold widget 中。
Scaffold Widget 为遵循 Material 设计守则的应用程序提供了一套统一的可视化结构。它同样支持一些特殊的 Material Design 组件,例如 Drawer,AppBar 和 SnackBar 等。
在这个例子中,我们想要创建一个带有 drawer 的 Scaffold:
Scaffold(
  appBar: AppBar(
    title: const Text('AppBar without hamburger button'),
  ),
  drawer: // Add a Drawer here in the next step.
);
2. 添加一个 drawer
我们现在可以在 Scaffold 上添加一个 drawer。虽然 drawer 可以是任何 widget,但最好还是使用 Material Library
中的 Drawer widget,因为这样才符合 Material Design 设计规范。
Scaffold(
appBar: AppBar(
title: const Text('AppBar with hamburger button'),
),
drawer: Drawer(
child: // Populate the Drawer in the next step.
),
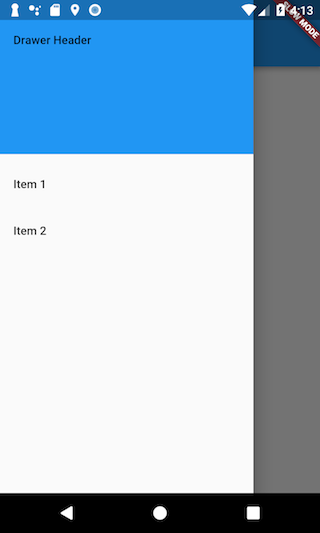
);3. 向 drawer 中添加内容
既然已经有了一个 Drawer,我们现在就可以向其中添加内容。在这个例子中,我们将使用 ListView。虽然你也可以使用 Column widget,但是 ListView 在这种情况下将是更好的选择,因为如果内容所占用的空间超出了屏幕的话,它将能够允许用户进行滚动。
我们将使用 DrawerHeader 和两个 ListTile widget 填充 ListView。有关使用 List 的更多信息,请参阅实用教程中的 list recipes。
Drawer(
  // Add a ListView to the drawer. This ensures the user can scroll
  // through the options in the drawer if there isn't enough vertical
  // space to fit everything.
  child: ListView(
    // Important: Remove any padding from the ListView.
    padding: EdgeInsets.zero,
    children: [
      const DrawerHeader(
        decoration: BoxDecoration(
          color: Colors.blue,
        ),
        child: Text('Drawer Header'),
      ),
      ListTile(
        title: const Text('Item 1'),
        onTap: () {
          // Update the state of the app.
          // ...
        },
      ),
      ListTile(
        title: const Text('Item 2'),
        onTap: () {
          // Update the state of the app.
          // ...
        },
      ),
    ],
  ),
);
4. 通过编程关闭 drawer
我们经常需要在用户点击某个项目后就将 Drawer 关掉。那么怎样才能做到这一点呢?请试试看 Navigator。
当用户打开 Drawer 时,Flutter 会将 drawer widget 覆盖在当前的导航堆栈上。因此,要关闭 drawer,我们可以通过调用 Navigator.pop(context) 来实现。
ListTile(
  title: const Text('Item 1'),
  onTap: () {
    // Update the state of the app
    // ...
    // Then close the drawer
    Navigator.pop(context);
  },
),
交互式样例
该示例展示了如何在 Scaffold 中使用 Drawer。
Drawer 中包含三个 ListTile。
_onItemTapped 方法会改变当前选中的元素,并在 Scaffold 中央展示对应的文字。
import 'package:flutter/material.dart';

void main() => runApp(const MyApp());

class MyApp extends StatelessWidget {
  const MyApp({super.key});

  static const appTitle = 'Drawer Demo';

  @override
  Widget build(BuildContext context) {
    return const MaterialApp(
      title: appTitle,
      home: MyHomePage(title: appTitle),
    );
  }
}

class MyHomePage extends StatefulWidget {
  const MyHomePage({super.key, required this.title});

  final String title;

  @override
  State<MyHomePage> createState() => _MyHomePageState();
}

class _MyHomePageState extends State<MyHomePage> {
  int _selectedIndex = 0;
  static const TextStyle optionStyle =
      TextStyle(fontSize: 30, fontWeight: FontWeight.bold);
  static const List<Widget> _widgetOptions = <Widget>[
    Text(
      'Index 0: Home',
      style: optionStyle,
    ),
    Text(
      'Index 1: Business',
      style: optionStyle,
    ),
    Text(
      'Index 2: School',
      style: optionStyle,
    ),
  ];

  void _onItemTapped(int index) {
    setState(() {
      _selectedIndex = index;
    });
  }

  @override
  Widget build(BuildContext context) {
    return Scaffold(
      appBar: AppBar(title: Text(widget.title)),
      body: Center(
        child: _widgetOptions[_selectedIndex],
      ),
      drawer: Drawer(
        // Add a ListView to the drawer. This ensures the user can scroll
        // through the options in the drawer if there isn't enough vertical
        // space to fit everything.
        child: ListView(
          // Important: Remove any padding from the ListView.
          padding: EdgeInsets.zero,
          children: [
            const DrawerHeader(
              decoration: BoxDecoration(
                color: Colors.blue,
              ),
              child: Text('Drawer Header'),
            ),
            ListTile(
              title: const Text('Home'),
              selected: _selectedIndex == 0,
              onTap: () {
                // Update the state of the app
                _onItemTapped(0);
                // Then close the drawer
                Navigator.pop(context);
              },
            ),
            ListTile(
              title: const Text('Business'),
              selected: _selectedIndex == 1,
              onTap: () {
                // Update the state of the app
                _onItemTapped(1);
                // Then close the drawer
                Navigator.pop(context);
              },
            ),
            ListTile(
              title: const Text('School'),
              selected: _selectedIndex == 2,
              onTap: () {
                // Update the state of the app
                _onItemTapped(2);
                // Then close the drawer
                Navigator.pop(context);
              },
            ),
          ],
        ),
      ),
    );
  }
}