根据屏幕方向更新界面
一般情况下,一旦一个应用的屏幕方向发生了改变,比如从横屏变成竖屏,其设计也将跟着更新。例如,在纵向模式下,我们可能想要依次显示各个项目,但在横向模式下,我们会把这些相同的项目并排放置。
在 Flutter 中,我们可以根据给定的 Orientation
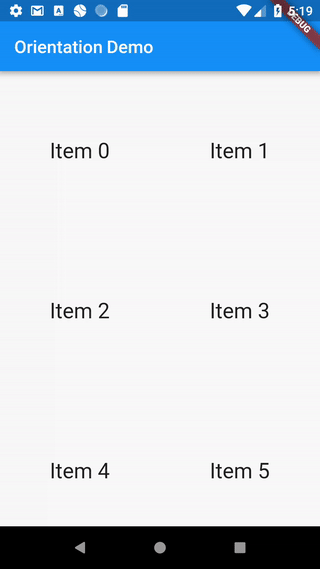
构建不同的布局。本示例中,我们将构建一个列表,在纵向模式下显示两列,在横向模式下显示三列。
-
创建一个列的数量为 2 的
GridView; -
使用
OrientationBuilder更改列数。
1. 创建一个列的数量为 2 的 GridView
首先,我们需要一个项目的列表来配合完成。我们需要使用一个在网格中显示项目的列表而非一个普通的列表。现在,我们将创建一个包含两个列的网格。
return GridView.count(
  // A list with 2 columns
  crossAxisCount: 2,
  // ...
);
要了解有关使用 GridViews 的更多信息,请参阅这个教程文档:创建一个网格列表。
2. 使用 OrientationBuilder 更改列数。
为了确定当前的屏幕方向 Orientation,我们可以使用 OrientationBuilder widget。
OrientationBuilder 通过比较父 widget 的可用宽度和高度来计算当前的 Orientation,并在父窗口大小更改时重建。
使用 Orientation,我们可以构建一个列表,在纵向模式下显示两列,在横向模式下显示三列。
body: OrientationBuilder(
  builder: (context, orientation) {
    return GridView.count(
      // Create a grid with 2 columns in portrait mode,
      // or 3 columns in landscape mode.
      crossAxisCount: orientation == Orientation.portrait ? 2 : 3,
    );
  },
),交互式样例
import 'package:flutter/material.dart';

void main() {
  runApp(const MyApp());
}

class MyApp extends StatelessWidget {
  const MyApp({super.key});

  @override
  Widget build(BuildContext context) {
    const appTitle = 'Orientation Demo';

    return const MaterialApp(
      title: appTitle,
      home: OrientationList(
        title: appTitle,
      ),
    );
  }
}

class OrientationList extends StatelessWidget {
  final String title;

  const OrientationList({super.key, required this.title});

  @override
  Widget build(BuildContext context) {
    return Scaffold(
      appBar: AppBar(title: Text(title)),
      body: OrientationBuilder(
        builder: (context, orientation) {
          return GridView.count(
            // Create a grid with 2 columns in portrait mode, or 3 columns in
            // landscape mode.
            crossAxisCount: orientation == Orientation.portrait ? 2 : 3,
            // Generate 100 widgets that display their index in the List.
            children: List.generate(100, (index) {
              return Center(
                child: Text(
                  'Item $index',
                  style: Theme.of(context).textTheme.displayLarge,
                ),
              );
            }),
          );
        },
      ),
    );
  }
}
Locking device orientation
In the previous section, you learned how to adapt the app UI to device orientation changes.
Flutter also allows you to specify the orientations your app supports
using the values of DeviceOrientation. You can either:
- Lock the app to a single orientation, like only the
portraitUpposition, or… - Allow multiple orientations, like both
portraitUpandportraitDown, but not landscape.
In the application main() method,
call SystemChrome.setPreferredOrientations()
with the list of preferred orientations that your app supports.
To lock the device to a single orientation, you can pass a list with a single item.
For a list of all the possible values, check out DeviceOrientation.
void main() {
  WidgetsFlutterBinding.ensureInitialized();
  SystemChrome.setPreferredOrientations([
    DeviceOrientation.portraitUp,
  ]);
  runApp(const MyApp());
}