将 Flutter module 集成到 iOS 项目
Flutter UI 组件可以渐进式地内嵌到你现有的 iOS 应用中,下面是几种方法:
-
Use the CocoaPods dependency manager and installed Flutter SDK.
In this case, the
flutter_moduleis compiled from the source each time the app is built. (Recommended.)
使用 CocoaPods 依赖管理器安装 Flutter SDK
使用这种方法,每次构建应用的时候都会从源代码中编译 flutter_module。(推荐)
- Create frameworks for the Flutter engine, your compiled Dart code, and all Flutter plugins. Here, you manually embed the frameworks, and update your existing application’s build settings in Xcode. This can be useful for teams that don’t want to require every developer to have the Flutter SDK and Cocoapods installed locally.
创建一个框架,把 Flutter 引擎、已编译的 Dart 代码和所有 Flutter 插件都放进去 这种方式你可以手动嵌入这个框架,并在 Xcode 中更改现有的应用的构建设置。如果不想要求开发团队的每一位成员都在本地安装 Flutter SDK 和 Cocoapods,这种方式比较适用。
- Create frameworks for your compiled Dart code, and all Flutter plugins. Use CocoaPods for the Flutter engine. With this option, embed the frameworks for your application and the plugins in Xcode, but distribute the Flutter engine as a CocoaPods podspec. This is similar to the second option, but it provides an alternative to distributing the large Flutter.xcframework.
为已编译的 Dart 代码和所有 Flutter 插件创建一个框架,对 Flutter 引擎使用 CocoaPods 来管理 这种方式是将应用内容和插件作为内嵌的框架,但将 Flutter 引擎作为 CocoaPods podspec 分发。这有点类似第二种方式,但是它为分发大型的 Flutter.xcframework 文件提供了替代方案。
例如使用 UIKit 构建的应用,请参阅 add_to_app 代码示例 中 iOS 这个目录。有关使用 SwiftUI 的示例,请参阅 News Feed App 中的 iOS 目录。
系统要求
你的开发环境必须满足 Flutter 对 macOS 系统的版本要求 并 已经安装 Xcode,Flutter 支持 iOS 11 及以上。此外,你还需要 1.10 或以上版本的 CocoaPods
创建 Flutter module
为了将 Flutter 集成到你的既有应用里,参考上面的任意方法先创建一个 Flutter module。
在命令行中执行:
cd some/path/
flutter create --template module my_flutter
Flutter module 会创建在 some/path/my_flutter/ 目录。如果你使用上述第一种方法,则应在与现有 iOS 应用工程的父目录中创建这个 Flutter module。
在这个目录中,你可以像在其它 Flutter 项目中一样,执行 flutter 命令。比如 flutter run --debug 或者 flutter build ios。同样,你也可以通过 Android Studio/IntelliJ 或者 VS Code
中的 Flutter 和 Dart 插件运行这个 module,在集成到现有应用前,这个项目在 Flutter module 中包含了一个单视图的示例代码,对 Flutter 侧代码的测试会有帮助。
Module 的目录结构
在 my_flutter module 里,目录结构和普通 Flutter 应用类似:
my_flutter/
├── .ios/
│   ├── Runner.xcworkspace
│   └── Flutter/podhelper.rb
├── lib/
│   └── main.dart
├── test/
└── pubspec.yaml
添加你的 Dart 代码到 lib/ 目录。
添加 Flutter 依赖到 my_flutter/pubspec.yaml,包括 Flutter packages 和 plugins。
.ios/ 隐藏文件夹包含了一个 Xcode workspace,用于单独运行你的 Flutter module。它是一个独立启动 Flutter 代码的壳工程,并且包含了一个帮助脚本,用于编译 framewroks 或者使用 CocoaPods 将 Flutter module 集成到你的既有应用。
在你的既有应用中集成 Flutter module
在你的 module 开发完成后,你就能使用页面顶部描述的方法将其嵌入到应用中去了。
使用 Flutter 会 增加应用体积 。
选项 A - 使用 CocoaPods 和 Flutter SDK 集成
这个方法需要你的项目的所有开发者,都在本地安装 Flutter SDK。你的工程在每次构建的的时候,都将会从源码里编译 Flutter 模块。只需要在 Xcode 中编译应用,就可以自动运行脚本来集成 Dart 代码和插件。这个方法允许你使用 Flutter module 中的最新代码快速迭代开发,而无需在 Xcode 以外执行额外的命令。
下面的示例假设你的既有应用和 Flutter module 在相邻目录。如果你有不同的目录结构,需要适配到对应的路径。
some/path/
├── my_flutter/
│   └── .ios/
│       └── Flutter/
│         └── podhelper.rb
└── MyApp/
    └── Podfile
如果你的应用下(MyApp)还没有 Podfile,请运行 pod init 来创建一个。你可以在 CocoaPods 起步指南
中了解更多。
-
在
Podfile中添加下面代码:flutter_application_path = '../my_flutter' load File.join(flutter_application_path, '.ios', 'Flutter', 'podhelper.rb') -
每个需要集成 Flutter 的 Podfile target,执行
install_all_flutter_pods(flutter_application_path):target 'MyApp' do install_all_flutter_pods(flutter_application_path) end -
在
Podfile的post_install部分,调用flutter_post_install(installer)。post_install do |installer| flutter_post_install(installer) if defined?(flutter_post_install) end -
运行
pod install。
podhelper.rb 脚本会把你的 plugins,
Flutter.framework,和 App.framework 集成到你的项目中。
你应用的 Debug 和 Release 编译配置,将会集成相对应的 Debug 或 Release 的 编译产物。可以增加一个 Profile 编译配置用于在 profile 模式下测试应用。
在 Xcode 中打开 MyApp.xcworkspace ,你现在可以使用 ⌘B 编译项目了。
选项 B - 在 Xcode 中集成 frameworks
除了上面的方法,你也可以创建必备的 frameworks,手动修改既有 Xcode 项目,将他们集成进去。当你组内其它成员们不能在本地安装 Flutter SDK 和 CocoaPods,或者你不想使用 CocoaPods 作为既有应用的依赖管理时,这种方法会比较合适。但是每当你在 Flutter module 中改变了代码,都必须运行 flutter build ios-framework。
下面的示例假设你想在 some/path/MyApp/Flutter/ 目录下创建 frameworks:
flutter build ios-framework --output=some/path/MyApp/Flutter/
some/path/MyApp/
└── Flutter/
    ├── Debug/
    │   ├── Flutter.xcframework
    │   ├── App.xcframework
    │   ├── FlutterPluginRegistrant.xcframework (only if you have plugins with iOS platform code)
    │   └── example_plugin.xcframework (each plugin is a separate framework)
    ├── Profile/
    │   ├── Flutter.xcframework
    │   ├── App.xcframework
    │   ├── FlutterPluginRegistrant.xcframework
    │   └── example_plugin.xcframework
    └── Release/
        ├── Flutter.xcframework
        ├── App.xcframework
        ├── FlutterPluginRegistrant.xcframework
        └── example_plugin.xcframework
在 Xcode 中将生成的 frameworks 集成到你的既有应用中。例如,你可以在 some/path/MyApp/Flutter/Release/
目录拖拽 frameworks 到你的应用 target 编译设置的
General > Frameworks, Libraries, and Embedded Content 下,然后在 Embed 下拉列表中选择 “Embed & Sign”。
链接到框架
例如,你可以将框架从 Finder 的 some/path/MyApp/Flutter/Release/
拖到你的目标项目中,然后点击以下步骤
build settings > Build Phases > Link Binary With Libraries。
在 target 的编译设置中的
Framework Search Paths (FRAMEWORK_SEARCH_PATHS)
增加 $(PROJECT_DIR)/Flutter/Release/。

Embed the frameworks
内嵌框架
生成的动态框架必须嵌入你的应用并且在运行时被加载。
After linking the frameworks, you should see them in the Frameworks, Libraries, and Embedded Content section of your target’s General settings. To embed the dynamic frameworks select Embed & Sign.
例如,你可以从应用框架组中拖拽框架(除了 FlutterPluginRegistrant 以及其他的静态框架)到你的目标 ‘ build settings > Build Phases > Embed Frameworks。然后从下拉菜单中选择 “Embed & Sign”。
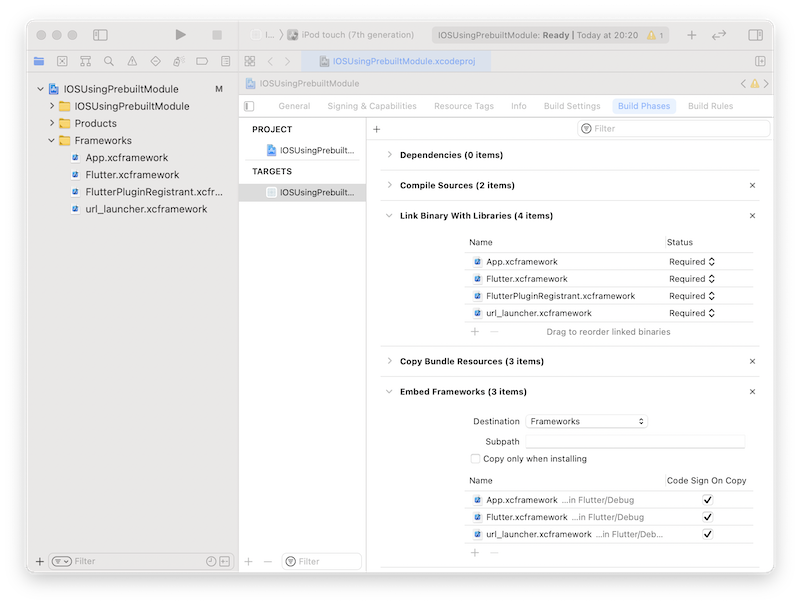
你现在可以在 Xcode中使用 ⌘B 编译项目。
选项 C - 使用 CocoaPods 在 Xcode 和 Flutter 框架中内嵌应用和插件框架
除了将一个很大的 Flutter.framework 分发给其他开发者、机器或者持续集成 (CI) 系统之外,你可以加入一个参数 --cocoapods 将 Flutter 框架作为一个
CocoaPods 的 podspec 文件分发。这将会生成一个 Flutter.podspec 文件而不再生成 Flutter.framework 引擎文件。如选项 B 中所说的那样,它将会生成 App.framework 和插件框架。
要生成 Flutter.podspec 和框架,命令行切换到 Flutter module 根目录,然后运行以下命令:
flutter build ios-framework --cocoapods --output=some/path/MyApp/Flutter/
some/path/MyApp/
└── Flutter/
    ├── Debug/
    │   ├── Flutter.podspec
    │   ├── App.xcframework
    │   ├── FlutterPluginRegistrant.xcframework
    │   └── example_plugin.xcframework (each plugin with iOS platform code is a separate framework)
    ├── Profile/
    │   ├── Flutter.podspec
    │   ├── App.xcframework
    │   ├── FlutterPluginRegistrant.xcframework
    │   └── example_plugin.xcframework
    └── Release/
        ├── Flutter.podspec
        ├── App.xcframework
        ├── FlutterPluginRegistrant.xcframework
        └── example_plugin.xcframework
Host apps using CocoaPods can add Flutter to their Podfile:
pod 'Flutter', :podspec => 'some/path/MyApp/Flutter/[build mode]/Flutter.podspec'
Link and embed the generated App.xcframework, FlutterPluginRegistrant.xcframework, and any plugin frameworks into your existing application as described in Option B.
Local Network Privacy Permissions
On iOS 14 and higher, enable the Dart multicast DNS
service in the Debug version of your app
to add debugging functionalities such as hot-reload and
DevTools via flutter attach.
One way to do this is to maintain a separate copy of your app’s Info.plist per build configuration. The following instructions assume the default Debug and Release. Adjust the names as needed depending on your app’s build configurations.
-
Rename your app’s Info.plist to Info-Debug.plist. Make a copy of it called Info-Release.plist and add it to your Xcode project.
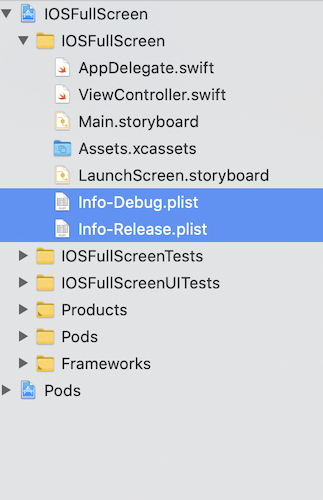
-
In Info-Debug.plist only add the key
NSBonjourServicesand set the value to an array with the string_dartobservatory._tcp. Note Xcode will display this as “Bonjour services”.Optionally, add the key
NSLocalNetworkUsageDescriptionset to your desired customized permission dialog text.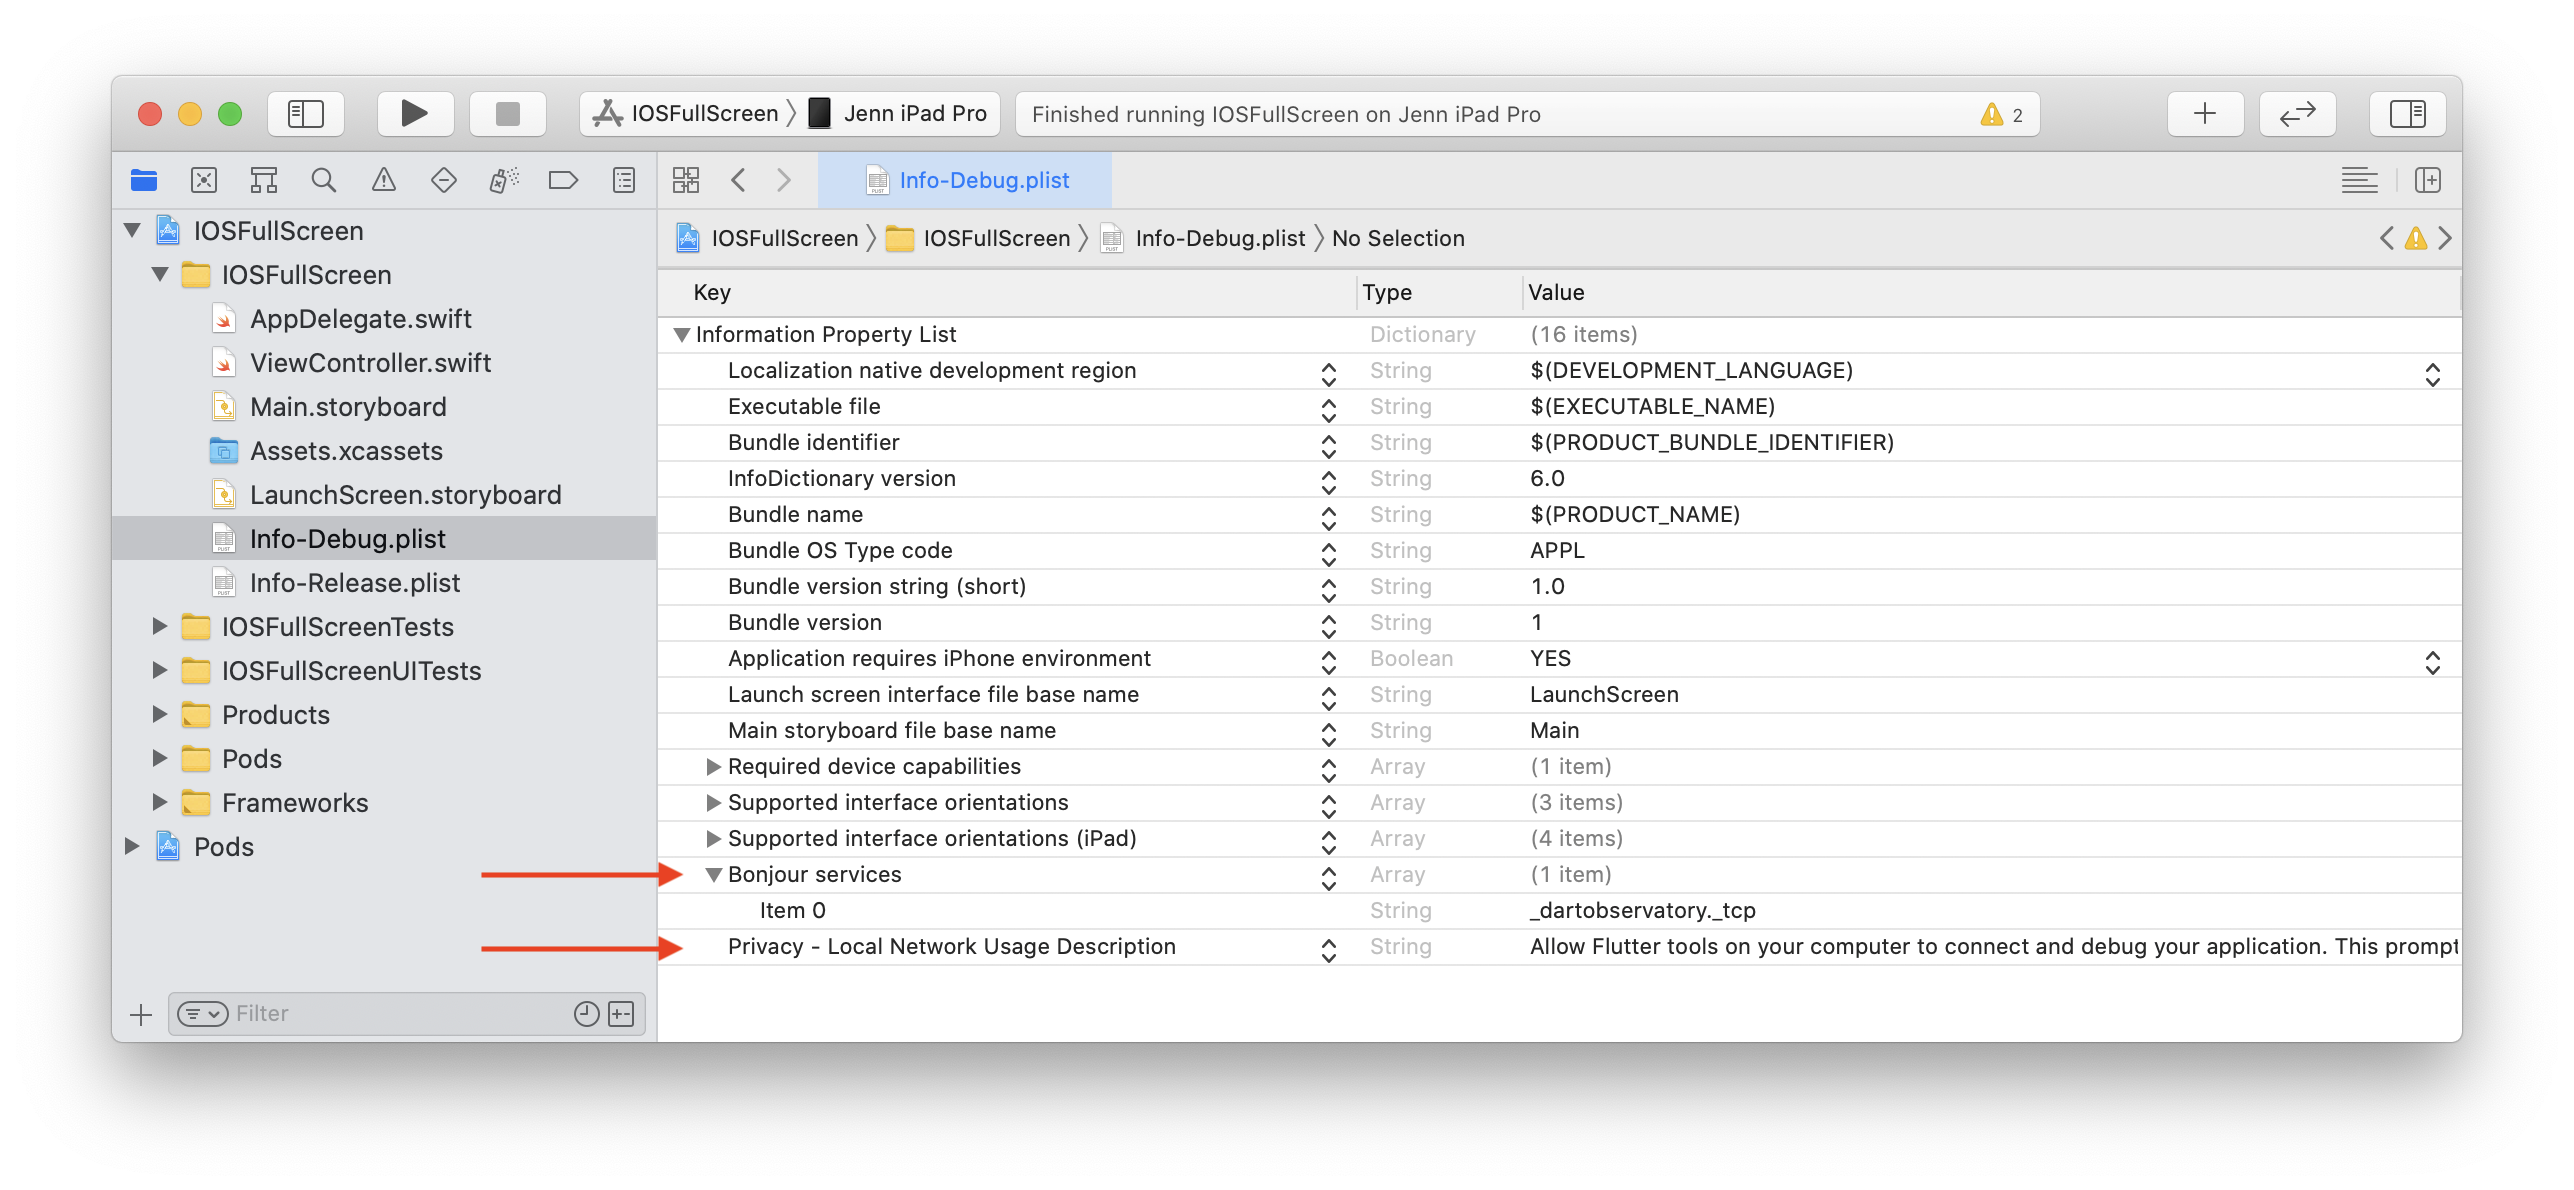
-
In your target’s build settings, change the Info.plist File (
INFOPLIST_FILE) setting path frompath/to/Info.plisttopath/to/Info-$(CONFIGURATION).plist.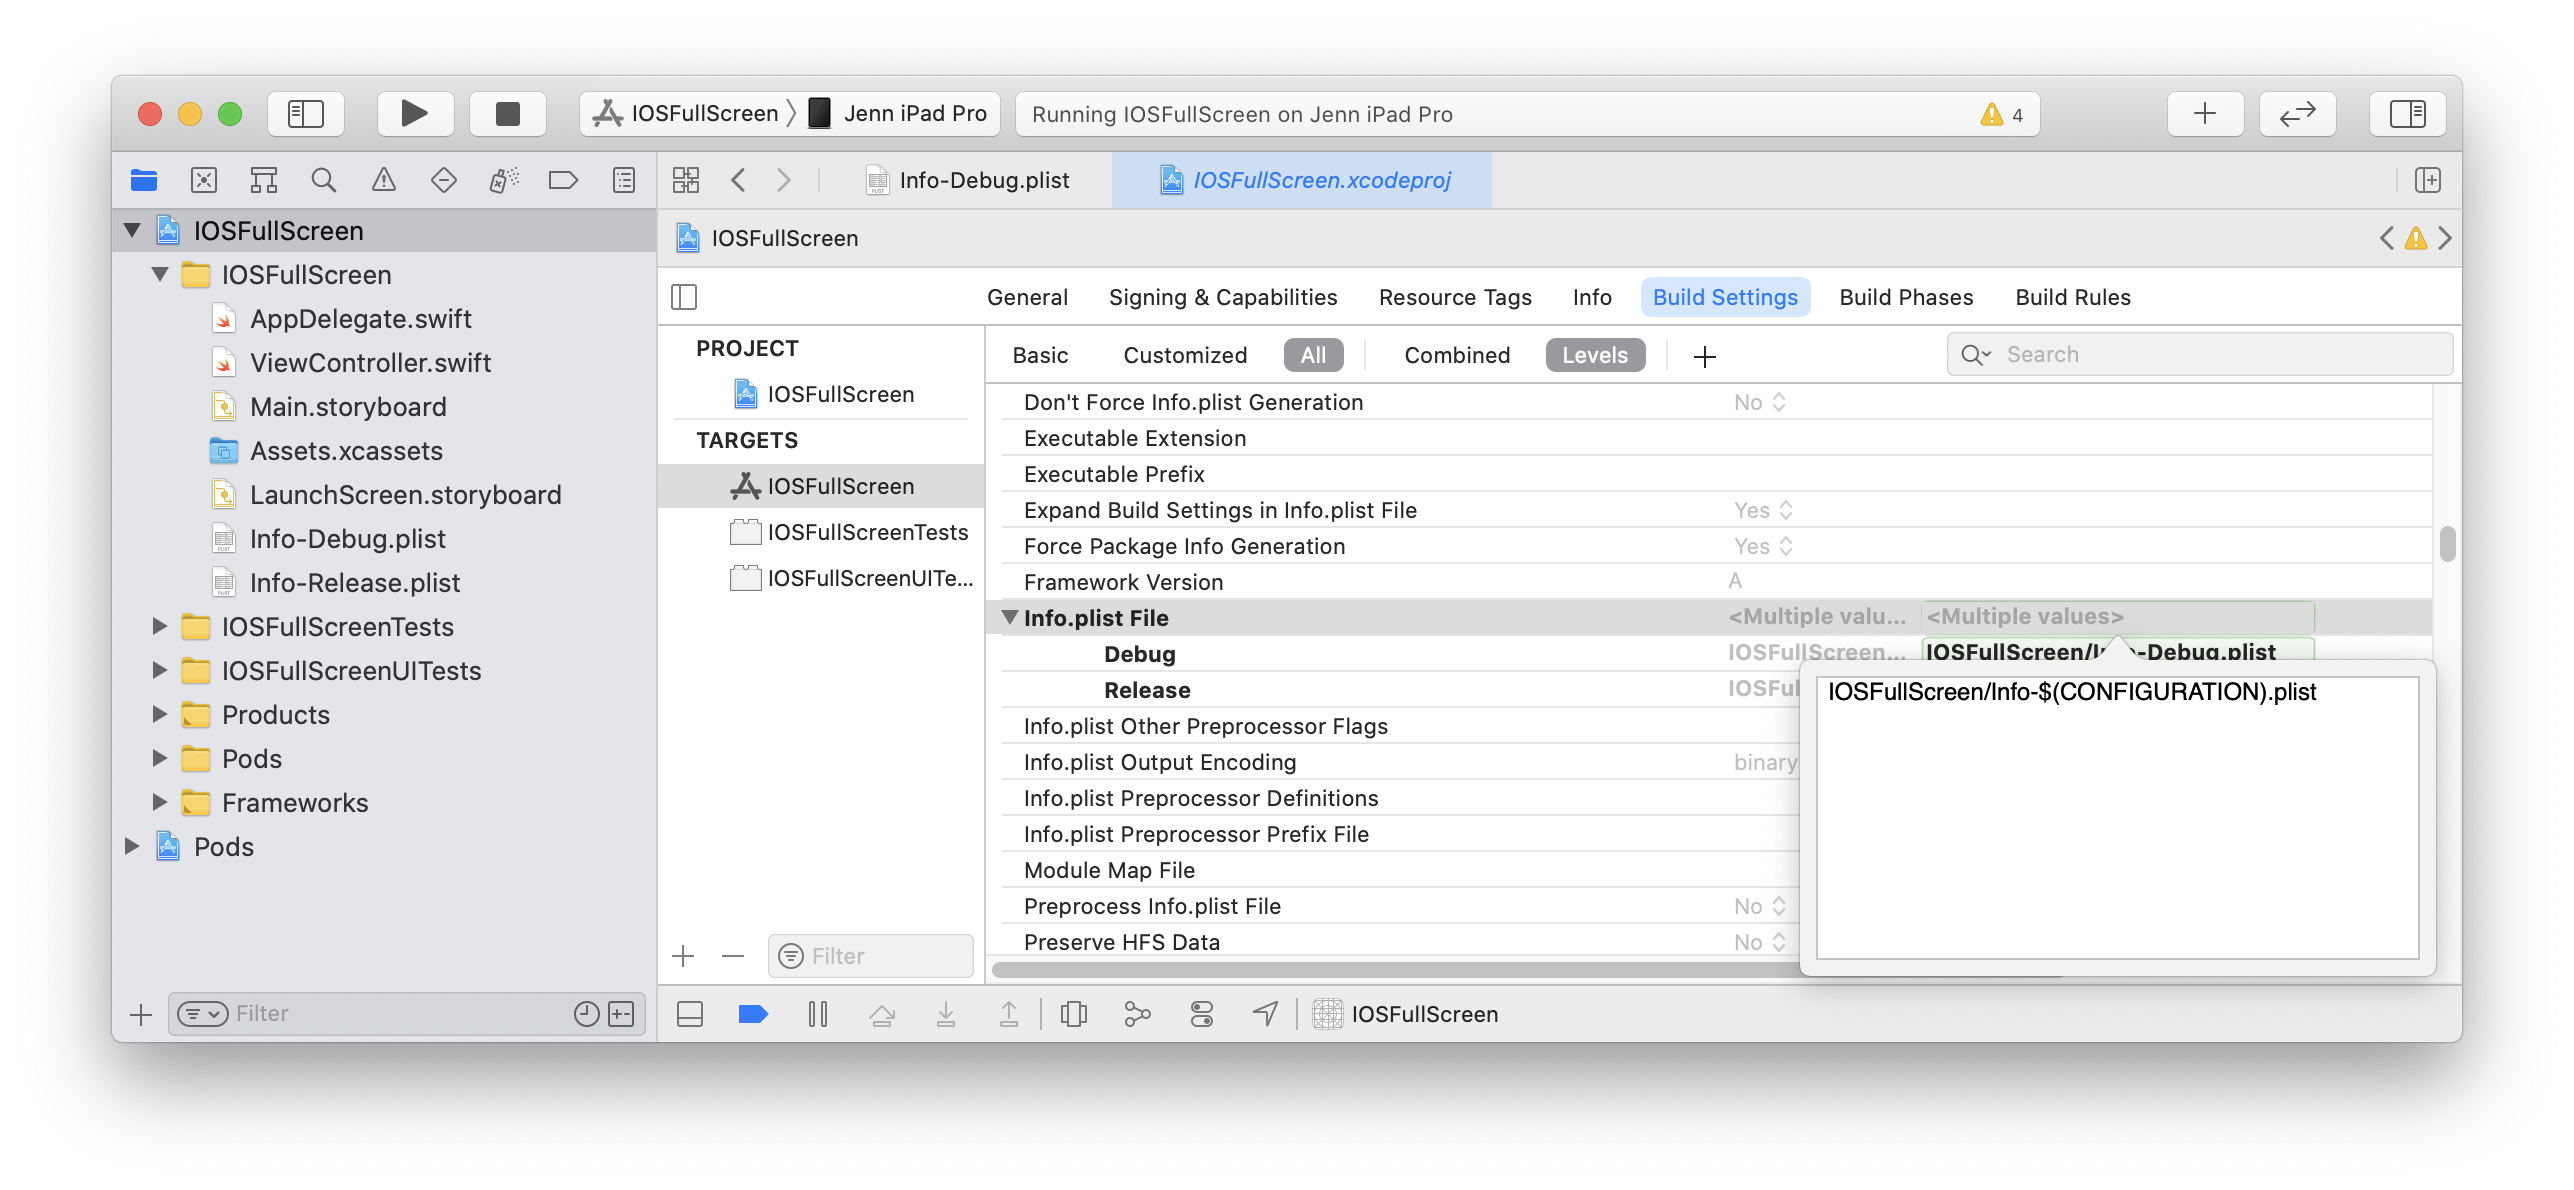
This will resolve to the path Info-Debug.plist in Debug and Info-Release.plist in Release.
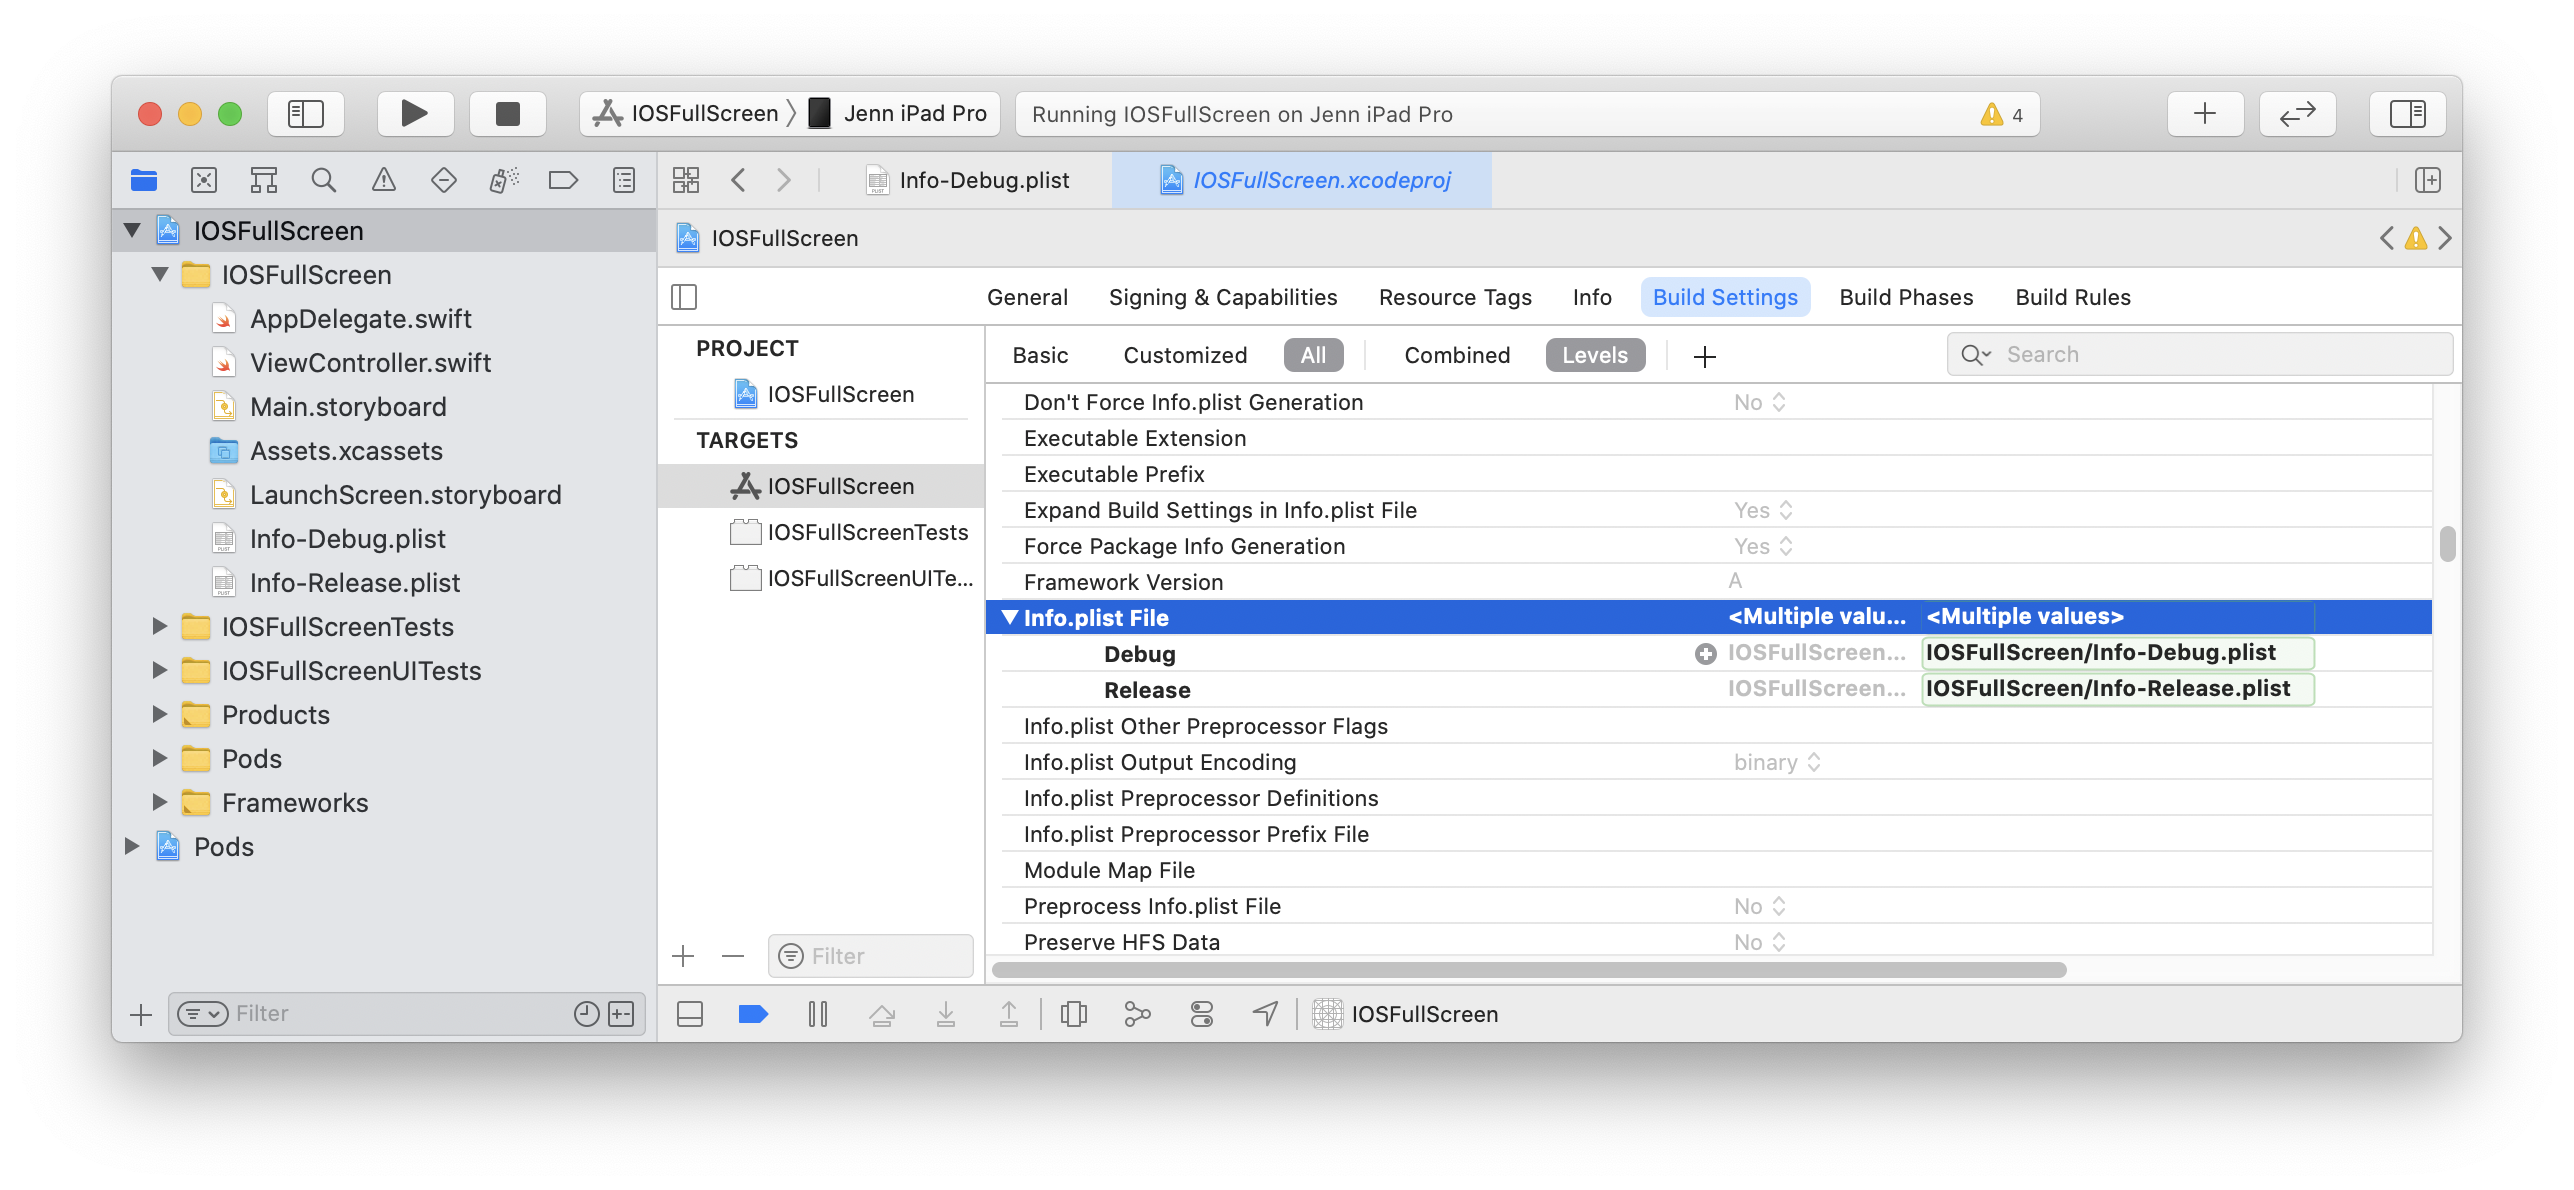
Alternatively, you can explicitly set the Debug path to Info-Debug.plist and the Release path to Info-Release.plist.
-
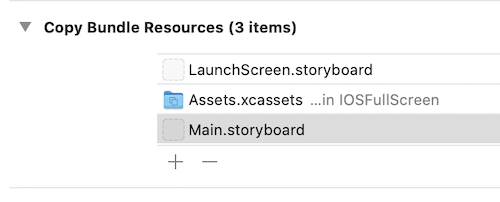
If the Info-Release.plist copy is in your target’s Build Settings > Build Phases > Copy Bundle Resources build phase, remove it.
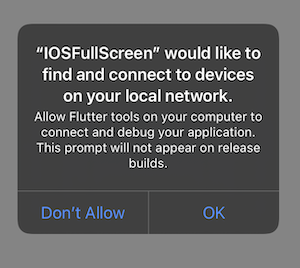
The first Flutter screen loaded by your Debug app will now prompt for local network permission. The permission can also be allowed by enabling Settings > Privacy > Local Network > Your App.
Apple Silicon (arm64 Macs)
在使用 Apple Silicon 芯片的 Mac 上 (M1),宿主应用将针对 arm64 架构的模拟器编译。尽管 Flutter 支持 arm64 的 iOS 模拟器,但一些插件仍有可能未进行支持。当你在使用这些插件时,你会遇到 Undefined symbols for architecture arm64 的错误,此时你必须从模拟器支持架构中移除 arm64。
在宿主应用的 Target 中,找到名为 Excluded Architectures (EXCLUDED_ARCHS) 的构建设置。单击右侧的箭头指示器图标以展开可用的构建配置。将鼠标悬停在 Debug 处并单击加号图标。将 Any SDK 更改为 Any iOS Simulator SDK。然后向构建设置值中添加 arm64。
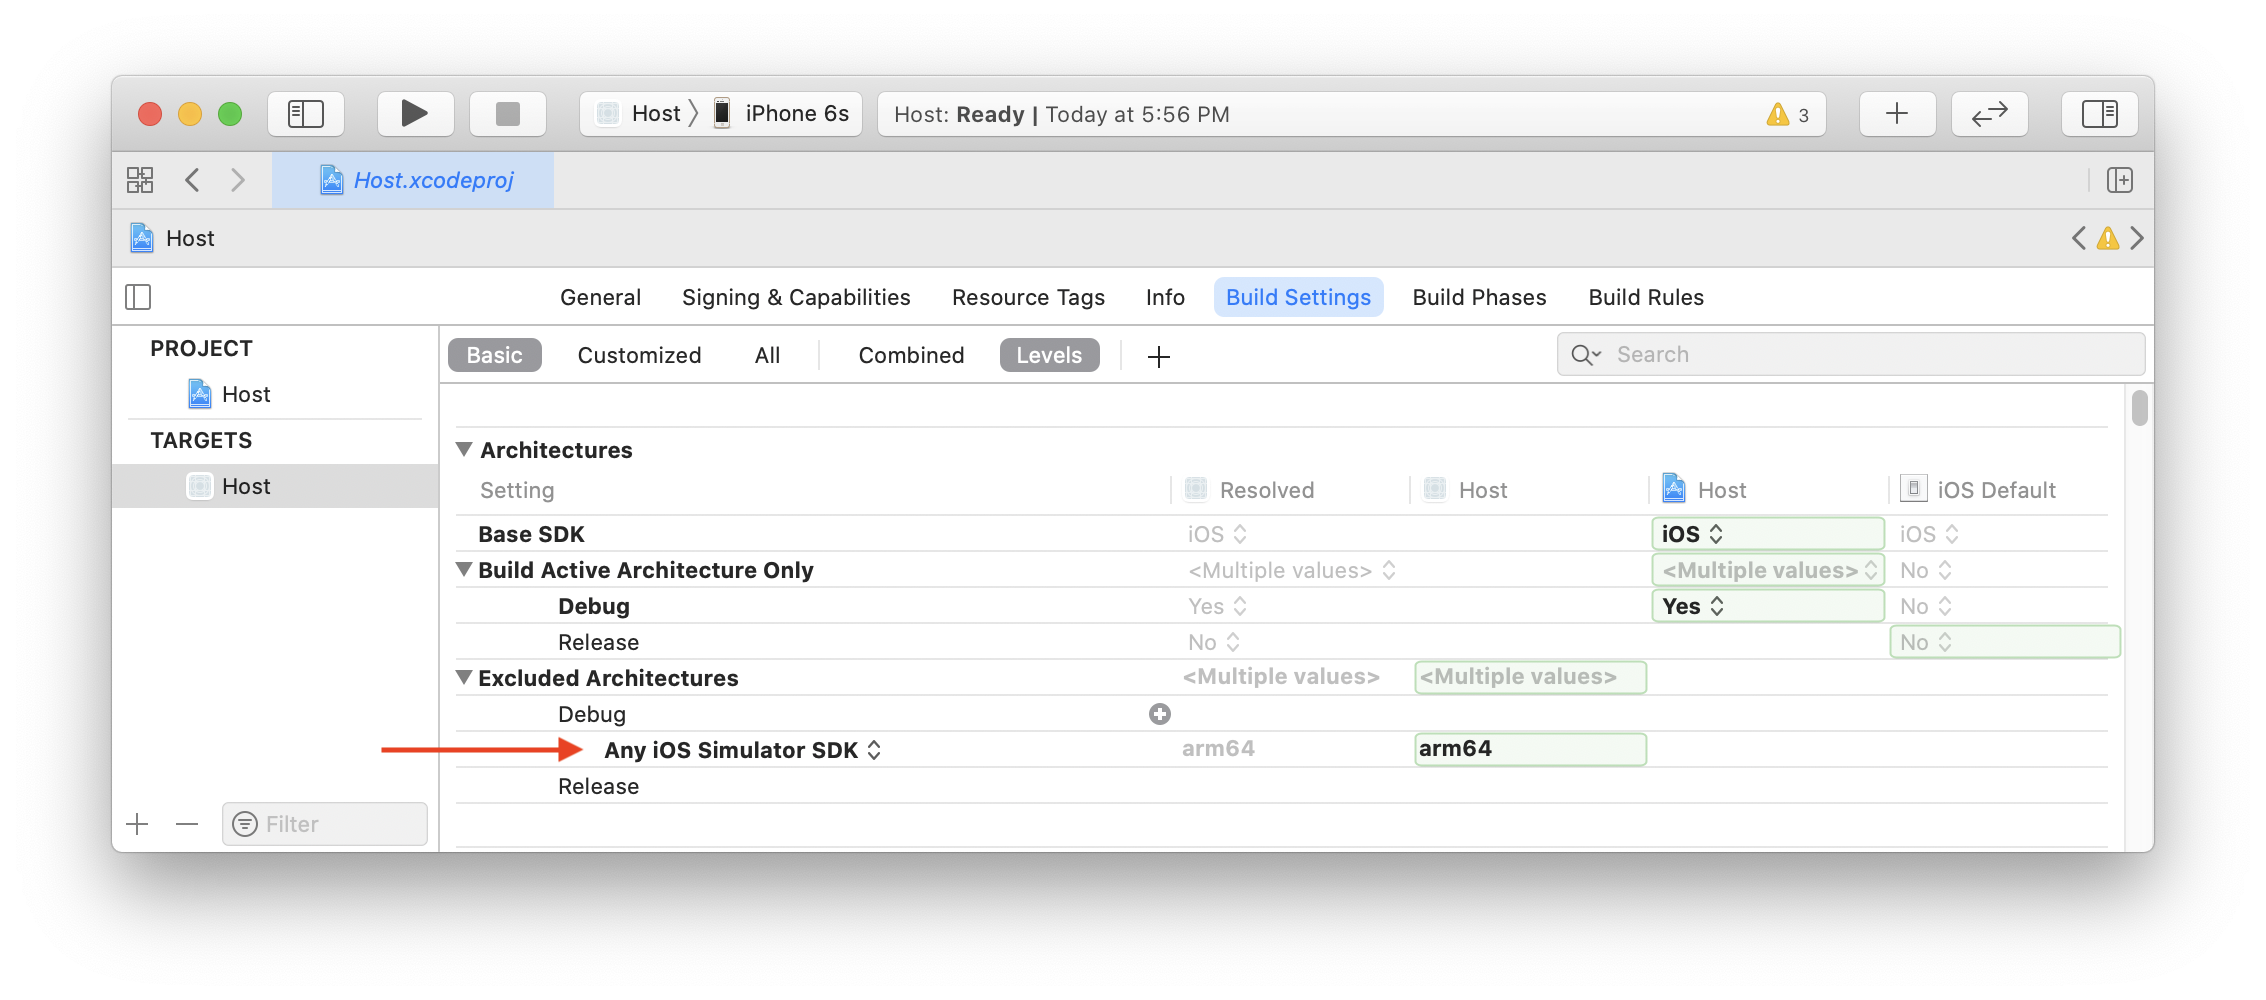
当全部都正确设置后,Xcode 将会向你的 project.pbxproj 文件中添加 "EXCLUDED_ARCHS[sdk=iphonesimulator*]" = arm64;。
然后对全部 iOS 目标再次执行单元测试。
开发
你现在可以 添加一个 Flutter 页面 到你的既有应用中。