构建和发布为 Android 应用
在一般的开发过程中,我们可以使用 flutter run 命令,或者 IntelliJ 工具栏中的 Run 和 Debug 来测试 app。这时候,Flutter 默认会为我们构建 app 的调试版本。
当想要发布 app 时,比如 发布到 Google Play Store,可以按照以下步骤来准备 Android 平台的 发布 版本。本页面的内容包含如下主题:
添加启动图标
当我们创建一个新的 Flutter app 的时候,它会有一个默认的启动图标。要自定义这个图标,可以参考使用 flutter_launcher_icons 这个 package。
或者,如果我们想手动操作,可以参考以下方法:
-
查看 Material Design Product Icons 指南中图标设计部分。
-
在
<app dir>/android/app/src/main/res/目录下,把我们的图标文件放在以 配置限定符 命名的文件夹中。类似默认的mipmap-文件夹这样的命名方式。 -
在
AndroidManifest.xml中,更新application标签中的android:icon属性来引用上一步骤中我们自己的图标文件 (例如,<application android:icon="@mipmap/ic_launcher" ...)。 -
用
flutter run运行 app,检查启动程序中的 app 图标是否已经替换成我们自己的图标文件。
启用 Material 组件
如果你的应用使用了 平台视图 (Platform Views),你可能要通过 Android 平台的入门指南文档 中的步骤使用 Material 组件:
举个例子:
-
在
<my-app>/android/app/build.gradle文件中添加 Android Material 组件依赖:
dependencies {
    // ...
    implementation 'com.google.android.material:material:<version>'
    // ...
}
查看最新的版本,请访问 Google Maven 仓库。
-
在
<my-app>/android/app/src/main/res/values/styles.xml文件中设置亮色主题:
-<style name="NormalTheme" parent="@android:style/Theme.Light.NoTitleBar">
+<style name="NormalTheme" parent="Theme.MaterialComponents.Light.NoActionBar">
- Set the dark theme in
<my-app>/android/app/src/main/res/values-night/styles.xml
-<style name="NormalTheme" parent="@android:style/Theme.Black.NoTitleBar">
+<style name="NormalTheme" parent="Theme.MaterialComponents.DayNight.NoActionBar">
Sign the app
为 app 签名
为了将你的应用发布到 Play 商店,你需要给你的应用进行数字签名。
Android 应用需要两个签名:上传签名 和 应用签名。
-
开发者上传到 Play Store 的
.aab或.apk需要有上传签名。 -
终端用户下载的
.apk文件需要有 应用签名。
请参考 Play Store 的官方文档 来创建你的应用签名。
参考以下步骤对你的应用进行签名。
创建一个用于上传的密钥库
如果你已经有一个密钥库了,可以直接跳到下一步,如果还没有,需要参考下面的方式创建一个:
-
在命令行窗口运行如下的命令:
在 macOS 或者 Linux 系统上,执行下面的代码:
keytool -genkey -v -keystore ~/upload-keystore.jks -keyalg RSA \
        -keysize 2048 -validity 10000 -alias upload
在 Windows 系统上,在 PoweShell 内执行以下代码:
keytool -genkey -v -keystore %userprofile%\upload-keystore.jks ^
        -storetype JKS -keyalg RSA -keysize 2048 -validity 10000 ^
        -alias upload
该命令将会把
upload-keystore.jks文件储存在你的主文件夹中。如果你想要储存在其他地方,请通过指定-keystore传入参数。 注意,请保证这个文件的私有性,不要将它提交到公共的代码管理空间。
从 app 中引用密钥库
创建一个名为 [project]/android/key.properties 的文件,它包含了密钥库位置的定义。在替换内容时请去除 < > 括号:
storePassword=<password-from-previous-step>
keyPassword=<password-from-previous-step>
keyAlias=upload
storeFile=<keystore-file-location>
storeFile 密钥路径在 macOS 上类似于 /Users/<user name>/upload-keystore.jks,在 Windows 上类似于 C:\\Users\\<user name>\\upload-keystore.jks。
在 gradle 中配置签名
在以 release 模式下构建你的应用时,修改 [project]/android/app/build.gradle
文件,以通过 gradle 配置你的上传密钥。
-
在
android代码块之前将你 properties 文件的密钥库信息添加进去:def keystoreProperties = new Properties() def keystorePropertiesFile = rootProject.file('key.properties') if (keystorePropertiesFile.exists()) { keystoreProperties.load(new FileInputStream(keystorePropertiesFile)) } android { ... }将
key.properties文件加载到keystoreProperties对象中。 -
找到
buildTypes代码块:buildTypes { release { // TODO: Add your own signing config for the release build. // Signing with the debug keys for now, // so `flutter run --release` works. signingConfig signingConfigs.debug } }将其替换为我们的配置内容:
   signingConfigs {
       release {
           keyAlias keystoreProperties['keyAlias']
           keyPassword keystoreProperties['keyPassword']
           storeFile keystoreProperties['storeFile'] ? file(keystoreProperties['storeFile']) : null
           storePassword keystoreProperties['storePassword']
       }
   }
   buildTypes {
       release {
           signingConfig signingConfigs.release
       }
   }
现在我们 app 的发布版本就会被自动签名了。
有关应用签名的更多信息,请查看 developer.android.com 的 为你的应用设置签名。
使用 R8 压缩你的代码
R8 是谷歌推出的最新代码压缩器,当你打包 release 版本的 APK 或者 AAB 时会默认开启。要关闭 R8,请运行 flutter build apk 或
flutter build appbundle 时加上 --no-shrink 参数。
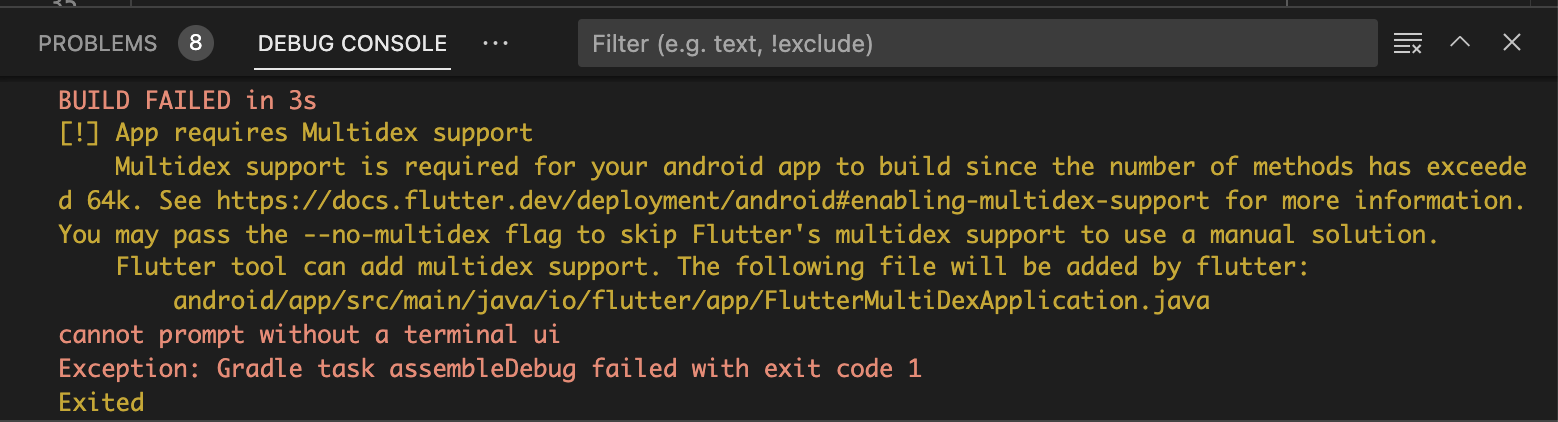
启用 multidex 支持
当你在编写较大的应用或使用体量较大的插件时,你可能会在最低的 API 目标版本低于 20 时,遇到 Android 的 dex 的 64k 方法数限制问题。当 flutter run 以调试模式运行应用时,由于缩减机制没有运行,该问题也有可能发生。
Flutter tool supports easily enabling multidex. The simplest way is to
opt into multidex support when prompted. The tool detects multidex build errors
and asks before making changes to your Android project.
Opting in allows Flutter to automatically depend on
androidx.multidex:multidex and use a generated
FlutterMultiDexApplication as the project’s application.
When you try to build and run your app with the Run and Debug options in your IDE, your build might fail with the following message:
To enable multidex from the command line,
run flutter run --debug and select an Android device:

When prompted, enter y.
The Flutter tool enables multidex support and retries the build:
Flutter 工具支持以便捷的方式启用 multidex 支持。当工具提示你需要支持时,跟随工具的指示进行调整,是最快的方式。
Flutter 工具会检测 multidex 的构建错误,并提示你是否要更改 Android 项目。在同意的情况下,项目会自动依赖 androidx.multidex:multidex,并且让项目的 Application 继承于 FlutterMultiDexApplication。
你也可以根据 Android 的指南,手动配置你的 Android 项目以支持 multidex。请务必指定 multidex keep 文件 以包含以下内容:
io/flutter/embedding/engine/loader/FlutterLoader.class
io/flutter/util/PathUtils.class
同时也要包含所有在应用启动时加载的其他类。参考 multidex 文档 了解更详细的手动适配指南。
检查 app manifest 文件
检查位于 [project]/android/app/src/main 的默认 App Manifest
文件 AndroidManifest.xml,并确认各个值都设置正确,特别是:
application
编辑 application
标签中的 android:label 来设置 app 的最终名字。
uses-permission
如果你的代码需要互联网交互,请加入 android.permission.INTERNET
权限标签。标准开发模版里并未加入这个权限(但是 Flutter debug 模版加入了这个权限),加入这个权限是为了允许 Flutter 工具和正在运行的 app 之间的通信。
Reviewing the Gradle build configuration
检查位于 [project]/android/app 的默认 Gradle 构建文件 (build.gradle)
并确认各个值都设置正确:
在 defaultConfig 配置中
applicationId
指定唯一的 应用 ID。
minSdkVersion
指定应用适配的 最低 SDK API 版本。默认为 flutter.minSdkVersion。
targetSdkVersion
指定应用适配的目标 SDK 版本。默认为 flutter.targetSdkVersion。
versionCode
用于 内部版本号 的正整数。该数字仅用于比较两个版本间数字较大的为更新版本。该版本不会对用户展示。
versionName
向用户展示的版本号。该字段必须设置为原始字符串或字符串资源的引用。
buildToolsVersion- The Gradle plugin specifies the default version of the build tools that your project uses. You can use this option to specify a different version of the build tools.
buildToolsVersion
指定你的项目使用的构建工具的版本。你也可以手动指定不同的构建工具的版本。
在 android 配置中
compileSdkVersion
指定 Gradle 用于编译应用的 API 版本。默认为 flutter.compileSdkVersion。
更多信息可以参考 Gradle 构建文件 文档中模块级构建的部分。
构建生产版本应用
当要发布到 Play Store 时,你有两种发布方式的选择:
-
App bundle (推荐)
-
APK
构建一个 app bundle
这个部分描述了如何构建一个发布的 app bundle。如果在前面的部分已经完成了签名步骤,发布的 bundle 会被签名。这时你也许想要 混淆你的 Dart 代码 以加大反编译难度。混淆你的代码需要在 build 的时候添加一些标志,并维护其他文件以消除反编译的堆栈跟踪。
使用如下命令:
-
运行
cd [project]。 -
运行
flutter build appbundle。 (运行flutter build默认构建一个发布版本。)
你的应用的 release bundle 会被创建到
<app dir>/build/app/outputs/bundle/release/app.aab.
此 app bundle 会默认地包含为 armeabi-v7a (ARM 32-bit)、arm64-v8a (ARM 64-bit) 以及 x86-64 (x86 64-bit) 编译的 Dart 和 Fluter 运行时代码。
测试 app bundle
一个 app bundle 可以用多种方法测试,这里介绍两种。
离线使用 bundle tool
-
如果你还没准备好,可以从 GitHub 仓库 下载
bundletool。 -
从你的 app bundle 生成 APKs。
-
将这 APKs 部署到 已连接的设备。
在线使用 Google Play
-
上传你的 bundle 到 Google Play 去测试它。或者在正式发布之前用 alpha 或 beta 频道去测试。
-
按照 这些步骤把你的 bundle 上传到 Play Store。
构建一个 APK
虽然 app bundle 比 APKs 更被推荐使用,但是有一些 Store 目前还不支持 app bundle方式。这种情况下,要为各种目标 ABI (Application Binary Interface) 分别构建发布的 APK 文件。
如果你完成签名步骤,APK 就被签名了。这时你也许想要 混淆你的 Dart 代码 以加大反编译难度。混淆你的代码需要在构建时添加一些参数。
使用如下命令:
-
输入命令
cd [project]。 -
Run
flutter build apk --split-per-abi.运行
flutter build apk --split-per-abi
(flutter build默认带有--release参数。)
这个命令会生成如下三个 APK 文件
[project]/build/app/outputs/apk/release/app-armeabi-v7a-release.apk[project]/build/app/outputs/apk/release/app-arm64-v8a-release.apk[project]/build/app/outputs/apk/release/app-x86_64-release.apk
如果移除 --split-per-abi 将会生成一个包含 所有 目标 ABI 的 fat APK 文件。这种 APK 文件将会在比单独构建的 APK 文件尺寸要大,会导致用户下载一些不适用于其设备架构的二进制文件。
在设备上安装 APK 文件
按照如下这些步骤,将前一步中构建出来的 APK 安装到 Android 设备上。
使用如下命令:
-
用 USB 线将 Android 设备连接到电脑上;
-
输入命令
cd [project]; -
运行
flutter install。
发布到 Google Play Store
要了解如何发布一个 app 到 Google Play Store,可以参考 Google Play 发布文档。
更新应用版本号
每个应用默认的初始版本号是 1.0.0。若要更新它,请转到 pubspec.yaml 文件并更新以下内容:
version: 1.0.0+1
版本号由三个点分隔的数字组成,例如上面样例中的 1.0.0。然后是可选的构建号,例如上面样例中的 1,以 + 分隔。
版本号与构建号都可以在 Flutter 打包时分别使用
--build-name 和 --build-number 重新指定。
在 Android 中,build-number 被用作 versionCode,
build-name 将作为 versionName 使用。更多信息请参考 Android 文档中的 为你的应用添加版本。
当重新构建 Android 应用后,任何在 pubspec 文件所做的版本号更新,都将会更新 local.properties 文件中的
versionName 和 versionCode。
Android 发布常见问题
这里是一些关于 Android 应用发布的常见问题。
我应该什么时候构建 app bundles 而不是 APKs?
Google Play Store 相对于 APKs 更建议你发布 app bundles,因为那样应用会更有效率地交付给你的用户。但是,如果你想将应用发布到其他的应用商店,APK可能是唯一选项。
什么是 fat APK?
一个 fat APK 是一个包含了支持多个 ABI 架构的 APK 文件。这样做的好处是单个 APK 可以运行在多个架构上,因此具有更广泛的兼容性。但同时缺点就是文件体积会比较大,导致用户在安装你的应用时会下载和储存更多的字节。当构建 APK 而不是 app bundles 时强烈建议分开构建 APK,如 build an APK 所描述的那样,使用 --split-per-abi 指令。
哪些目标架构是被支持的?
当使用 release 模式构建你的应用时, Flutter app 可以基于 armeabi-v7a (ARM 32 位)、 arm64-v8a (ARM 64 位) 以及 x86-64 (x86 64 位) 被编译。 Flutter 目前支持通过 ARM 模拟 x86 Android。
如何为一个使用 flutter build appbundle 创建的 app bundle 签名?
请查看 创建一个密钥库。
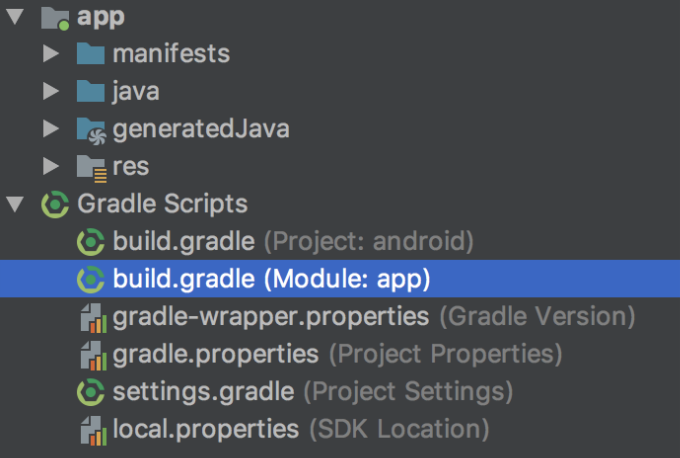
如何使用 Android Studio 构建一个发布?
在Android Studio中, 打开你的 app 文件夹下的 android/
文件夹. 然后在项目面板中选择 build.gradle (Module: app) :
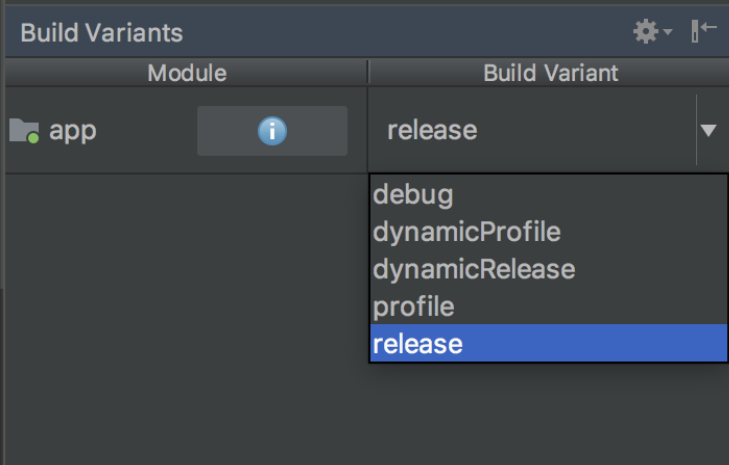
接下来,选择构建变体。在主菜单中点击 Build > Select Build Variant。从 Build Variants 面板中选择任意一个变体(默认是 debug)。
生成的 app bundle 或 APK 文件会在你的 app 所在文件夹下的 build/app/outputs 文件夹下。