简单的应用状态管理
现在大家已经了解了 声明式的编程思维 和 短时 (ephemeral) 与应用 (app) 状态 之间的区别,现在可以学习如何管理简单的全局应用状态。
Now that you know about declarative UI programming and the difference between ephemeral and app state, you are ready to learn about simple app state management.
在这里,我们打算使用 provider
package。如果你是 Flutter 的初学者,而且也没有很重要的理由必须选择别的方式来实现(Redux、Rx、hooks 等等),那么这就是你应该入门使用的。provider
非常好理解而且不需要写很多代码。它也会用到一些在其它实现方式中用到的通用概念。
On this page, we are going to be using the provider
package.
If you are new to Flutter and you don’t have a strong reason to choose
another approach (Redux, Rx, hooks, etc.), this is probably the approach
you should start with. The provider
package is easy to understand
and it doesn’t use much code.
It also uses concepts that are applicable in every other approach.
即便如此,如果你已经从其它响应式框架上积累了丰富的状态管理经验的话,那么可以在 状态 (State) 管理参考 中找到相关的 package 和教程。
That said, if you have a strong background in state management from other reactive frameworks, you can find packages and tutorials listed on the options page.
示例
Our example
为了演示效果,我们实现下面这个简单应用。
For illustration, consider the following simple app.
这个应用有两个独立的页面:一个类别页面和一个购物车页面(分别用 MyCatalog
,MyCart
widget 来展示)。虽然看上去是一个购物应用程序,但是你也可以和社交网络应用类比(把类别页面替换成朋友圈,把购物车替换成关注的人)。
The app has two separate screens: a catalog,
and a cart (represented by the MyCatalog
,
and MyCart
widgets, respectively). It could be a shopping app,
but you can imagine the same structure in a simple social networking
app (replace catalog for “wall” and cart for “favorites”).
类别页面包含一个自定义的 app bar (MyAppBar
)
以及一个包含元素列表的可滑动的视图 (MyListItems
)。
The catalog screen includes a custom app bar (MyAppBar
)
and a scrolling view of many list items (MyListItems
).
这是应用程序对应的可视化的 widget 树。
Here’s the app visualized as a widget tree.
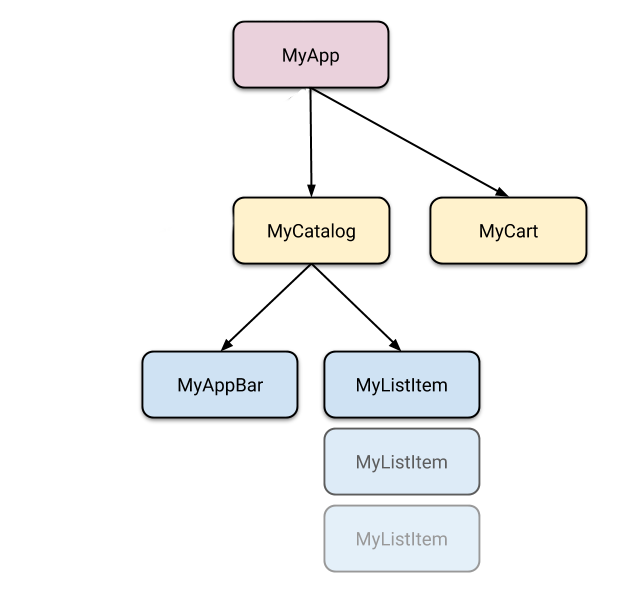
所以我们有至少 5 个 Widget
的子类。他们中有很多需要访问一些全局的状态。比如,MyListItem
会被添加到购物车中。但是它可能需要检查和自己相同的元素是否已经被添加到购物车中。
So we have at least 5 subclasses of Widget
. Many of them need
access to state that “belongs” elsewhere. For example, each
MyListItem
needs to be able to add itself to the cart.
It might also want to see whether the currently displayed item
is already in the cart.
这里我们出现了第一个问题:我们把当前购物车的状态放在哪合适呢?
This takes us to our first question: where should we put the current state of the cart?
提高状态的层级
Lifting state up
在 Flutter 中,有必要将存储状态的对象置于 widget 树中对应 widget 的上层。
In Flutter, it makes sense to keep the state above the widgets that use it.
为什么呢?在类似 Flutter 的声明式框架中,如果你想要修改 UI,那么你需要重构它。并没有类似 MyCart.updateWith(somethingNew)
的简单调用方法。换言之,你很难通过外部调用方法修改一个 widget。即便你自己实现了这样的模式,那也是和整个框架不相兼容。
Why? In declarative frameworks like Flutter, if you want to change the UI,
you have to rebuild it. There is no easy way to have
MyCart.updateWith(somethingNew)
. In other words, it’s hard to
imperatively change a widget from outside, by calling a method on it.
And even if you could make this work, you would be fighting the
framework instead of letting it help you.
// BAD: DO NOT DO THIS
void myTapHandler() {
var cartWidget = somehowGetMyCartWidget();
cartWidget.updateWith(item);
}
即使你实现了上面的代码,也得处理 MyCart
widget 中的代码:
Even if you get the above code to work,
you would then have to deal
with the following in the MyCart
widget:
// BAD: DO NOT DO THIS
Widget build(BuildContext context) {
return SomeWidget(
// The initial state of the cart.
);
}
void updateWith(Item item) {
// Somehow you need to change the UI from here.
}
你可能需要考虑当前 UI 的状态,然后把最新的数据添加进去。但是这样的方式很难避免出现 bug。
You would need to take into consideration the current state of the UI and apply the new data to it. It’s hard to avoid bugs this way.
在 Flutter 中,每次当 widget 内容发生改变的时候,你就需要构造一个新的。你会调用 MyCart(contents)
(构造函数),而不是 MyCart.updateWith(somethingNew)
(调用方法)。因为你只能通过父类的 build 方法来构建新 widget,如果你想修改 contents
,就需要调用 MyCart
的父类甚至更高一级的类。
In Flutter, you construct a new widget every time its contents change.
Instead of MyCart.updateWith(somethingNew)
(a method call)
you use MyCart(contents)
(a constructor). Because you can only
construct new widgets in the build methods of their parents,
if you want to change contents
, it needs to live in MyCart
’s
parent or above.
// GOOD void myTapHandler(BuildContext context) { var cartModel = somehowGetMyCartModel(context); cartModel.add(item); }
这里 MyCart
可以在各种版本的 UI 中调用同一个代码路径。
Now MyCart
has only one code path for building any version of the UI.
// GOOD Widget build(BuildContext context) { var cartModel = somehowGetMyCartModel(context); return SomeWidget( // Just construct the UI once, using the current state of the cart. // ··· ); }
在我们的例子中,contents
会存在于 MyApp
的生命周期中。当它发生改变的时候,它会从上层重构 MyCart
。因为这个机制,所以 MyCart
无需考虑生命周期的问题—它只需要针对
contents
声明所需显示内容即可。当内容发生改变的时候,旧的 MyCart
widget 就会消失,完全被新的 widget 替代。
In our example, contents
needs to live in MyApp
. Whenever it changes,
it rebuilds MyCart
from above (more on that later). Because of this,
MyCart
doesn’t need to worry about lifecycle—it just declares
what to show for any given contents
. When that changes, the old
MyCart
widget disappears and is completely replaced by the new one.
这就是我们所说的 widget 是不可变的。因为它们会直接被替换。
This is what we mean when we say that widgets are immutable. They don’t change—they get replaced.
现在我们知道在哪里放置购物车的状态,接下来看一下如何读取该状态。
Now that we know where to put the state of the cart, let’s see how to access it.
读取状态
Accessing the state
当用户点击类别页面中的一个元素,它会被添加到购物车里。然而当购物车在 widget 树中,处于 MyListItem 的层级之上时,又该如何访问状态呢?
When a user clicks on one of the items in the catalog,
it’s added to the cart. But since the cart lives above MyListItem
,
how do we do that?
一个简单的实现方法是提供一个回调函数,当 MyListItem
被点击的时候可以调用。
Dart 的函数都是 first class 对象,所以你可以以任意方式传递它们。所以在 MyCatalog
里你可以使用下面的代码:
A simple option is to provide a callback that MyListItem
can call
when it is clicked. Dart’s functions are first class objects,
so you can pass them around any way you want. So, inside
MyCatalog
you can define the following:
@override Widget build(BuildContext context) { return SomeWidget( // Construct the widget, passing it a reference to the method above. MyListItem(myTapCallback), ); } void myTapCallback(Item item) { print('user tapped on $item'); }
这段代码是没问题的,但是对于全局应用状态来说你需要在不同的地方进行修改,可能需要大量传递回调函数—。
This works okay, but for an app state that you need to modify from many different places, you’d have to pass around a lot of callbacks—which gets old pretty quickly.
幸运的是 Flutter 在 widget 中存在一种机制,能够为其子孙节点提供数据和服务。(换言之,不仅仅是它的子节点,所有在它下层的 widget 都可以)。就像你所了解的,
Flutter 中的 Everything is a Widget™。这里的机制也是一种 widget —InheritedWidget
, InheritedNotifier
,
InheritedModel
等等。我们这里不会详细解释他们,因为这些 widget 都太底层。
Fortunately, Flutter has mechanisms for widgets to provide data and
services to their descendants (in other words, not just their children,
but any widgets below them). As you would expect from Flutter,
where Everything is a Widget™, these mechanisms are just special
kinds of widgets—InheritedWidget
, InheritedNotifier
,
InheritedModel
, and more. We won’t be covering those here,
because they are a bit low-level for what we’re trying to do.
我们会用一个 package 来和这些底层的 widget 打交道,就是 provider
package。
Instead, we are going to use a package that works with the low-level
widgets but is simple to use. It’s called provider
.
在使用 provider
之前,请不要忘记在
pubspec.yaml
文件里加入依赖。
Before working with provider
,
don’t forget to add the dependency on it to your pubspec.yaml
.
name: my_name
description: Blah blah blah.
# ...
dependencies:
flutter:
sdk: flutter
provider: ^4.0.0
dev_dependencies:
# ...
现在可以在代码里加入 import 'package:provider/provider.dart';
进而开始构建你的应用了/
Now you can import 'package:provider/provider.dart';
and start building.
provider
package 中,你无须关心回调或者 InheritedWidgets
。但是你需要理解三个概念:
With provider
, you don’t need to worry about callbacks or
InheritedWidgets
. But you do need to understand 3 concepts:
- ChangeNotifier
- ChangeNotifierProvider
- Consumer
ChangeNotifier
ChangeNotifier
是 Flutter SDK 中的一个简单的类。它用于向监听器发送通知。换言之,如果被定义为 ChangeNotifier
,你可以订阅它的状态变化。(这和大家所熟悉的观察者模式相类似)。
ChangeNotifier
is a simple class included in the Flutter SDK which provides
change notification to its listeners. In other words, if something is
a ChangeNotifier
, you can subscribe to its changes. (It is a form of
Observable, for those familiar with the term.)
在 provider
中,ChangeNotifier
是一种能够封装应用程序状态的方法。对于特别简单的程序,你可以通过一个 ChangeNotifier
来满足全部需求。在相对复杂的应用中,由于会有多个模型,所以可能会有多个 ChangeNotifier
。
(不是必须得把 ChangeNotifier
和 provider
结合起来用,不过它确实是一个特别简单的类)。
In provider
, ChangeNotifier
is one way to encapsulate your application
state. For very simple apps, you get by with a single ChangeNotifier
.
In complex ones, you’ll have several models, and therefore several
ChangeNotifiers
. (You don’t need to use ChangeNotifier
with provider
at all, but it’s an easy class to work with.)
在我们的购物应用示例中,我们打算用 ChangeNotifier
来管理购物车的状态。我们创建一个新类,继承它,像下面这样:
In our shopping app example, we want to manage the state of the cart in a
ChangeNotifier
. We create a new class that extends it, like so:
class CartModel extends ChangeNotifier { /// Internal, private state of the cart. final List<Item> _items = []; /// An unmodifiable view of the items in the cart. UnmodifiableListView<Item> get items => UnmodifiableListView(_items); /// The current total price of all items (assuming all items cost $42). int get totalPrice => _items.length * 42; /// Adds [item] to cart. This and [removeAll] are the only ways to modify the /// cart from the outside. void add(Item item) { _items.add(item); // This call tells the widgets that are listening to this model to rebuild. notifyListeners(); } /// Removes all items from the cart. void removeAll() { _items.clear(); // This call tells the widgets that are listening to this model to rebuild. notifyListeners(); } }
唯一一行和 ChangeNotifier
相关的代码就是调用 notifyListeners()
。当模型发生改变并且需要更新 UI 的时候可以调用该方法。而剩下的代码就是 CartModel
和它本身的业务逻辑。
The only code that is specific to ChangeNotifier
is the call
to notifyListeners()
. Call this method any time the model changes in a way
that might change your app’s UI. Everything else in CartModel
is the
model itself and its business logic.
ChangeNotifier
是 flutter:foundation
的一部分,而且不依赖 Flutter 中任何高级别类。测试起来非常简单(你都不需要使用 widget 测试)。比如,这里有一个针对 CartModel
简单的单元测试:
ChangeNotifier
is part of flutter:foundation
and doesn’t depend on
any higher-level classes in Flutter. It’s easily testable (you don’t even need
to use widget testing for it). For example,
here’s a simple unit test of CartModel
:
test('adding item increases total cost', () { final cart = CartModel(); final startingPrice = cart.totalPrice; cart.addListener(() { expect(cart.totalPrice, greaterThan(startingPrice)); }); cart.add(Item('Dash')); });
ChangeNotifierProvider
widget 可以向其子孙节点暴露一个 ChangeNotifier
实例。它属于 provider
package。
ChangeNotifierProvider
is the widget that provides an instance of
a ChangeNotifier
to its descendants. It comes from the provider
package.
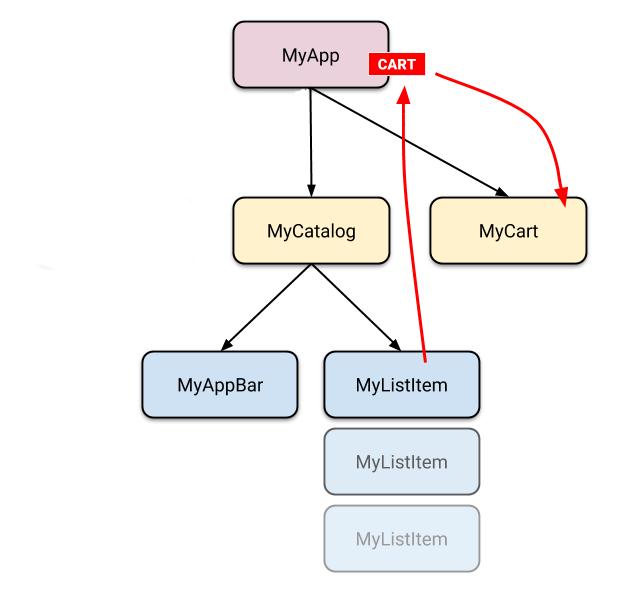
我们已经知道了该把 ChangeNotifierProvider
放在什么位置:在需要访问它的 widget 之上。在 CartModel
里,也就意味着将它置于 MyCart
和 MyCatalog
之上。
We already know where to put ChangeNotifierProvider
: above the widgets that
need to access it. In the case of CartModel
, that means somewhere
above both MyCart
and MyCatalog
.
你肯定不愿意把 ChangeNotifierProvider
放的级别太高(因为你不希望破坏整个结构)。但是在我们这里的例子中,MyCart
和 MyCatalog
之上只有 MyApp
。
You don’t want to place ChangeNotifierProvider
higher than necessary
(because you don’t want to pollute the scope). But in our case,
the only widget that is on top of both MyCart
and MyCatalog
is MyApp
.
void main() {
runApp(
ChangeNotifierProvider(
create: (context) => CartModel(),
child: MyApp(),
),
);
}
请注意我们定义了一个 builder 来创建一个 CartModel
的实例。
ChangeNotifierProvider
非常聪明,它 不会 重复实例化 CartModel
,除非在个别场景下。如果该实例已经不会再被调用,
ChangeNotifierProvider
也会自动调用 CartModel
的 dispose()
方法。
Note that we’re defining a builder that creates a new instance
of CartModel
. ChangeNotifierProvider
is smart enough not to rebuild
CartModel
unless absolutely necessary. It also automatically calls
dispose()
on CartModel
when the instance is no longer needed.
如果你想提供更多状态,可以使用 MultiProvider
:
If you want to provide more than one class, you can use MultiProvider
:
void main() {
runApp(
MultiProvider(
providers: [
ChangeNotifierProvider(create: (context) => CartModel()),
Provider(create: (context) => SomeOtherClass()),
],
child: MyApp(),
),
);
}
Consumer
现在 CartModel
已经通过 ChangeNotifierProvider
在应用中与 widget 相关联。我们可以开始调用它了。
Now that CartModel
is provided to widgets in our app through the
ChangeNotifierProvider
declaration at the top, we can start using it.
完成这一步需要通过 Consumer
widget。
This is done through the Consumer
widget.
return Consumer<CartModel>(
builder: (context, cart, child) {
return Text("Total price: ${cart.totalPrice}");
},
);
我们必须指定要访问的模型类型。在这个示例中,我们要访问 CartModel
那么就写上 Consumer<CartModel>
。
We must specify the type of the model that we want to access.
In this case, we want CartModel
, so we write
Consumer<CartModel>
. If you don’t specify the generic (<CartModel>
),
the provider
package won’t be able to help you. provider
is based on types,
and without the type, it doesn’t know what you want.
Consumer
widget 唯一必须的参数就是 builder。当 ChangeNotifier
发生变化的时候会调用 builder 这个函数。(换言之,当你在模型中调用 notifyListeners()
时,所有和 Consumer
相关的 builder 方法都会被调用。)
The only required argument of the Consumer
widget
is the builder. Builder is a function that is called whenever the
ChangeNotifier
changes. (In other words, when you call notifyListeners()
in your model, all the builder methods of all the corresponding
Consumer
widgets are called.)
builder 在被调用的时候会用到三个参数。第一个是 context
。在每个 build 方法中都能找到这个参数。
The builder is called with three arguments. The first one is context
,
which you also get in every build method.
builder 函数的第二个参数是 ChangeNotifier
的实例。它是我们最开始就能得到的实例。你可以通过该实例定义 UI 的内容。
The second argument of the builder function is the instance of
the ChangeNotifier
. It’s what we were asking for in the first place.
You can use the data in the model to define what the UI should look like
at any given point.
第三个参数是 child
,用于优化目的。如果 Consumer
下面有一个庞大的子树,当模型发生改变的时候,该子树 并不会 改变,那么你就可以仅仅创建它一次,然后通过 builder 获得该实例。
The third argument is child
, which is there for optimization.
If you have a large widget subtree under your Consumer
that doesn’t change when the model changes, you can construct it
once and get it through the builder.
return Consumer<CartModel>( builder: (context, cart, child) => Stack( children: [ // Use SomeExpensiveWidget here, without rebuilding every time. child, Text("Total price: ${cart.totalPrice}"), ], ), // Build the expensive widget here. child: SomeExpensiveWidget(), );
最好能把 Consumer
放在 widget 树尽量低的位置上。你总不希望 UI 上任何一点小变化就全盘重新构建 widget 吧。
It is best practice to put your Consumer
widgets as deep in the tree
as possible. You don’t want to rebuild large portions of the UI
just because some detail somewhere changed.
// DON'T DO THIS return Consumer<CartModel>( builder: (context, cart, child) { return HumongousWidget( // ... child: AnotherMonstrousWidget( // ... child: Text('Total price: ${cart.totalPrice}'), ), ); }, );
换成:
Instead:
// DO THIS return HumongousWidget( // ... child: AnotherMonstrousWidget( // ... child: Consumer<CartModel>( builder: (context, cart, child) { return Text('Total price: ${cart.totalPrice}'); }, ), ), );
Provider.of
有的时候你不需要模型中的 数据 来改变 UI,但是你可能还是需要访问该数据。比如,ClearCart
按钮能够清空购物车的所有商品。它不需要显示购物车里的内容,只需要调用 clear()
方法。
Sometimes, you don’t really need the data in the model to change the
UI but you still need to access it. For example, a ClearCart
button wants to allow the user to remove everything from the cart.
It doesn’t need to display the contents of the cart,
it just needs to call the clear()
method.
我们可以使用 Consumer<CartModel>
来实现这个效果,不过这么实现有点浪费。因为我们让整体框架重构了一个无需重构的 widget。
We could use Consumer<CartModel>
for this,
but that would be wasteful. We’d be asking the framework to
rebuild a widget that doesn’t need to be rebuilt.
所以这里我们可以使用 Provider.of
,并且将 listen
设置为 false
。
For this use case, we can use Provider.of
,
with the listen
parameter set to false
.
Provider.of<CartModel>(context, listen: false).removeAll();
在 build 方法中使用上面的代码,当 notifyListeners
被调用的时候,并不会使 widget 被重构。
Using the above line in a build method won’t cause this widget to
rebuild when notifyListeners
is called.
把代码集成在一起
Putting it all together
你可以在文章中 查看这个示例。如果你想参考稍微简单一点的示例,可以看看 Counter 应用程序是如何
基于 provider
实现的。
You can check out the example covered in this article.
If you want something simpler,
see what the simple Counter app looks like when
built with provider
.
通过跟着这些文章的学习,你已经大大提高了创建一个包含状态管理应用的能力。试着自己用 provider
构建一个应用来掌握这些技能吧!
By following along with these articles, you’ve greatly
improved your ability to create state-based applications.
Try building an application with provider
yourself to
master these skills.
为了解释它,请参考下面的简单应用。
For illustration, consider the following simple app.
这个应用有两个不用的页面,一个目录页面和一个购物车页面(分别代表了 MyCatalog
,和 MyCart
widgets)。这是一个购物应用,但是你可以想像成一个简单的社交网络中的相同结构的应用(将目录页面替换 “墙”,购物车替换成“收藏夹”)。
The app has two separate screens: a catalog,
and a cart (represented by the MyCatalog
,
and MyCart
widgets, respectively). It could be a shopping app,
but you can imagine the same structure in a simple social networking
app (replace catalog for “wall” and cart for “favorites”).