使用 tabs
在 Material Design 设计准则里,tabs 是一种常用的布局模型。 Flutter 自带的 Material 库 可以帮助开发者们非常便捷的创建 tab 布局。
这份教程将帮助你创建一个 tabs 布局样例,请参见如下步骤:
步骤
-
创建
TabController -
创建 tabs
-
为每个 tab 创建内容
1. 创建 TabController
为了使所选的 tab 与它所对应的内容能够同步变化,需要用 TabController 进行控制。
我们既可以手动创建一个 TabController ,也能够直接使用
DefaultTabController widget。
最简单的选择是使用 DefaultTabController widget,因为它能够创建出一个可供所有子 widgets 使用的 TabController。
return MaterialApp(
  home: DefaultTabController(
    length: 3,
    child: Scaffold(),
  ),
);
2. 创建 tabs
现在我们已经成功创建了 TabController,接下来就可以用 TabBar widget
来创建 tabs。下面这个示例创建了包含三组
Tab widget 的 TabBar(一个),并把它放置于 AppBar widget 中。
return MaterialApp(
  home: DefaultTabController(
    length: 3,
    child: Scaffold(
      appBar: AppBar(
        bottom: const TabBar(
          tabs: [
            Tab(icon: Icon(Icons.directions_car)),
            Tab(icon: Icon(Icons.directions_transit)),
            Tab(icon: Icon(Icons.directions_bike)),
          ],
        ),
      ),
    ),
  ),
);
TabBar 默认将会在 Widget 树中向上寻找离它最近的一个
DefaultTabController 节点作为自己的 TabController。如果你想手动创建 TabController,那么你必须将它作为参数传给 TabBar。
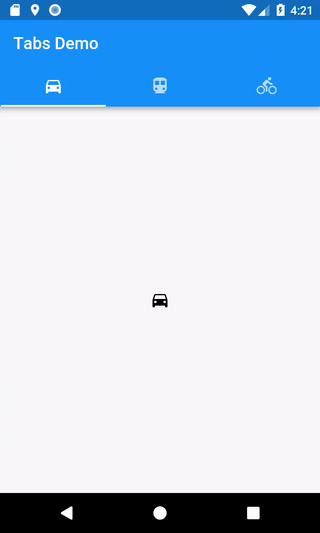
3. 为每个 tab 创建内容
现在我们已经成功创建了一些 tabs,接下来要实现的是 tab 被选中时显示其对应的内容。为了实现这个效果,我们将使用
TabBarView widget。
body: const TabBarView(
  children: [
    Icon(Icons.directions_car),
    Icon(Icons.directions_transit),
    Icon(Icons.directions_bike),
  ],
),
交互式样例
import 'package:flutter/material.dart';

void main() {
  runApp(const TabBarDemo());
}

class TabBarDemo extends StatelessWidget {
  const TabBarDemo({super.key});

  @override
  Widget build(BuildContext context) {
    return MaterialApp(
      home: DefaultTabController(
        length: 3,
        child: Scaffold(
          appBar: AppBar(
            bottom: const TabBar(
              tabs: [
                Tab(icon: Icon(Icons.directions_car)),
                Tab(icon: Icon(Icons.directions_transit)),
                Tab(icon: Icon(Icons.directions_bike)),
              ],
            ),
            title: const Text('Tabs Demo'),
          ),
          body: const TabBarView(
            children: [
              Icon(Icons.directions_car),
              Icon(Icons.directions_transit),
              Icon(Icons.directions_bike),
            ],
          ),
        ),
      ),
    );
  }
}