Start building Flutter iOS apps on macOS
Verify system requirements
To install and run Flutter, your macOS environment must meet the following hardware and software requirements.
Hardware requirements
Your macOS Flutter development environment must meet the following minimal hardware requirements.
| Requirement | Minimum | Recommended |
|---|---|---|
| CPU Cores | 4 | 8 |
| Memory in GB | 8 | 16 |
| Display resolution in pixels | WXGA (1366 x 768) | FHD (1920 x 1080) |
| Free disk space in GB | 36.0 | 56.0 |
Software requirements
To write and compile Flutter code for iOS, install the following packages.
Operating system
Flutter supports macOS 10.15 (Catalina) or later.
This guide presumes your Mac runs the zsh as your default shell.
To verify your shell configuration, expand this section
Like most UNIX-like operating system, macOS can support multiple shells,
like bash, zsh, and sh.
As of the October 2019 release of macOS Catalina (macOS 10.15),
Zsh or zsh is the default shell for macOS.
Check and set zsh as default
-
To verify
zshwas set as the default macOS shell, run the Directory Services command line utility.$ dscl . -read ~/ UserShellshould print the following as its response.
UserShell: /bin/zshYou can skip the remaining steps.
-
If you need to install
zsh, follow the procedure in this Wiki. -
If you need to change your default shell to
zsh, run thechshcommand.$ chsh -s `which zsh`
To learn more about macOS and zsh, check out
Use zsh as the default shell on your Mac
in the macOS documentation.
Some Flutter components require the Rosetta 2 translation process on Macs running Apple silicon. To run all Flutter components on Apple silicon, install Rosetta 2.
$ sudo softwareupdate --install-rosetta --agree-to-license
Development tools
Download and install the following packages.
- Xcode 15 to debug and compile native Swift or ObjectiveC code. The Xcode installation includes Git 2.27 or later to manage source code.
- CocoaPods 1.13 to compile enable Flutter plugins in your native apps.
The developers of the preceding software provide support for those products. To troubleshoot installation issues, consult that product’s documentation.
当你在当前版本运行 flutter doctor 的时候,它可能会列出这些软件包的其他不同版本。如果出现这种情况,请安装它推荐的版本。
Text editor or integrated development environment
You can build apps with Flutter using any text editor or integrated development environment (IDE) combined with Flutter’s command-line tools.
Using an IDE with a Flutter extension or plugin provides code completion, syntax highlighting, widget editing assists, debugging, and other features.
Popular options include:
- Visual Studio Code 1.77 or later with the Flutter extension for VS Code.
- Android Studio 2023.1 (Hedgehog) or later with the Flutter plugin for IntelliJ.
- IntelliJ IDEA 2023.1 or later with both the Flutter plugin for IntelliJ and the Android plugin for IntelliJ.
安装 Flutter SDK
你可以使用 VS Code Flutter 扩展或自行下载安装 Flutter 压缩包,来安装 Flutter SDK。
使用 VS Code 安装 Flutter
在使用以下流程来安装 Flutter 前,请确保你已经安装 Visual Studio Code 1.77 或更高版本,以及 Flutter extension for VS Code。
根据 VS Code 的提示,安装 Flutter
-
启动 VS Code。
-
打开 命令面板 (Command Palette),按下快捷键 Command + Shift + P。
-
在 命令面板 (Command Palette) 中输入
flutter。 -
选择 Flutter: New Project。
-
VS Code 会提示你在计算机上找到 Flutter SDK。
-
如果你已经安装 Flutter SDK,请单击 Locate SDK。
-
如果你没有安装 Flutter SDK, 请单击 Download SDK。
如果你没有按照 开发工具的必要条件 安装 Git ,单击该按钮后会导航至 Flutter 安装页面。
-
-
当提示 Which Flutter template? 的时候,请忽略它。可以按下 Esc。你可以在检查完开发配置后创建初始测试项目。
下载 Flutter SDK
-
当对话框 Select Folder for Flutter SDK 显示时,选择你想要安装 Flutter 的位置。
VS Code 会打开你默认的位置。你可以选择其他位置。
请考虑
~/development/这样的位置 -
单击 Clone Flutter。
在下载 Flutter 时,VS Code 会弹出该通知:
Downloading the Flutter SDK. This may take a few minutes.下载需要一些时间。如果你怀疑下载被挂起,请单击 Cancel 取消下载后,再重新尝试安装。
-
Flutter 一旦完成下载, 输出 (Output) 面板就会显示。
Checking Dart SDK version...
Downloading Dart SDK from the Flutter engine ...
Expanding downloaded archive...
成功后,VS Code 会弹出该通知:
Initializing the Flutter SDK. This may take a few minutes.初始化时,输出 (Output) 面板会显示下面的内容:
Building flutter tool...
Running pub upgrade...
Resolving dependencies...
Got dependencies.
Downloading Material fonts...
Downloading Gradle Wrapper...
Downloading package sky_engine...
Downloading flutter_patched_sdk tools...
Downloading flutter_patched_sdk_product tools...
Downloading windows-x64 tools...
Downloading windows-x64/font-subset tools...
该进程还会运行
flutter doctor -v。此时,请忽略该输出。因为 Flutter Doctor 可能会显示与本次快速启动无关的错误。Flutter 安装成功后,VS Code 会弹出该通知:
Do you want to add the Flutter SDK to PATH so it's accessible in external terminals? -
VS Code 可能会显示一则 Google Analytics 的通知。
如果你同意,请单击 OK。
-
在所有 Terminal 窗口中启用
flutter:-
关闭,然后重新打开所有 Terminal 窗口。
-
重新启动 VS Code。
-
下载并安装 Flutter
从归档列表中下载 Flutter SDK 压缩包,将压缩包移动到你想要的位置,然后解压 SDK,以此来安装 Flutter。
-
下载以下 Flutter SDK 最新 stable 版本的压缩包。
Intel 处理器 Apple Silicon 处理器 (获取中…) (获取中…) 关于其他发布渠道和旧版本,请查阅 Flutter SDK 归档列表。
Flutter SDK 应该会下载至 macOS 默认下载目录:
~/Downloads/。 -
创建一个文件夹,用于安装 Flutter。
可以考虑在
~/development/中创建一个目录。 -
将 Flutter SDK 压缩文件 (zip) 解压到你想要存储的目录中。可以使用以下指令进行解压。
$ unzip ~/development/flutter_sdk_v1.0.0.zip -d ~/development/完成后,Flutter SDK 应该会位于
~/development/flutter目录中。
Add Flutter to your PATH
To run Flutter commands in the Terminal,
add Flutter to the PATH environment variable.
This guide presumes your Mac runs the latest default shell, zsh.
Zsh uses the .zshenv file for environment variables.
-
Launch your preferred text editor.
-
If it exists, open the Zsh environmental variable file
~/.zshenvin your text editor. If it doesn’t, create~/.zshenv. -
Copy the following line and paste it at the end of your
~/.zshenvfile.export PATH=$HOME/development/flutter/bin:$PATH -
Save your
~/.zshenvfile. -
To apply this change, restart all open terminal sessions.
If you use another shell, check out this tutorial on setting your PATH.
如果你已经安装了所有必要条件和 Flutter SDK,你应该就可以在 macOS 上为 iOS 开发 Flutter。
Configure iOS development
Configure Xcode
To develop Flutter apps for macOS, install Xcode to compile to native bytecode.
-
To configure the command-line tools to use the installed version of Xcode, run the following commands.
$ sudo sh -c 'xcode-select -s /Applications/Xcode.app/Contents/Developer && xcodebuild -runFirstLaunch'To use the latest version of Xcode, use this path. If you need to use a different version, specify that path instead.
-
To install the iOS Simulator, run the following command.
$ xcodebuild -downloadPlatform iOS -
Sign the Xcode license agreement.
$ sudo xcodebuild -license
Try to keep to the current version of Xcode.
Configure your target iOS device
With Xcode, you can run Flutter apps on an iOS device or on the simulator.
Configure your iOS simulator
To prepare to run and test your Flutter app on the iOS simulator, follow this procedure.
-
To start the Simulator, run the following command:
$ open -a Simulator -
Set your Simulator to use a 64-bit device. This covers the iPhone 5s or later.
-
From Xcode, choose a simulator device type.
-
Go to Window > Devices and Simulators.
You can also press Cmd + Shift + 2.
-
Once the Devices and Simulators dialog opens, click Simulators.
-
Choose a Simulator from the left-hand list or press + to create a new simulator.
-
-
From the Simulator app, go to File > Open Simulator > Choose your target iOS device.
-
To check the device version in the Simulator, open the Settings app > General > About.
-
-
The simulated high-screen density iOS devices might overflow your screen. If that appears true on your Mac, change the presented size in the Simulator app.
Display Size Menu command Keyboard shortcut Small Window > Physical Size Cmd + 1 Moderate Window > Point Accurate Cmd + 2 HD accurate Window > Pixel Accurate Cmd + 3 Fit to screen Window > Fit Screen Cmd + 4
Set up your target physical iOS device
To deploy your Flutter app to a physical iPhone or iPad, you need to do the following:
- Create an Apple Developer account.
- Set up physical device deployment in Xcode.
- Create a development provisioning profile to self-sign certificates.
- Install the third-party CocoaPods dependency manager if your app uses Flutter plugins.
Create your Apple ID and Apple Developer account
To test deploying to a physical iOS device, you need an Apple ID.
To distribute your app to the App Store, you must enroll in the Apple Developer Program.
If you only need to test deploying your app, complete the first step and move on to the next section.
-
If you don’t have an Apple ID, create one.
-
If you haven’t enrolled in the Apple Developer program, enroll now.
To learn more about membership types, check out Choosing a Membership.
Attach your physical iOS device to your Mac
Configure your physical iOS device to connect to Xcode.
-
Attach your iOS device to the USB port on your Mac.
-
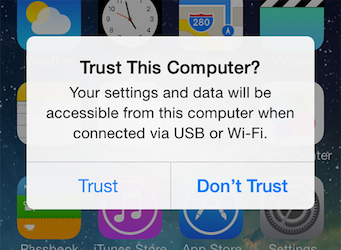
On first connecting your iOS device to your Mac, your iOS device displays the Trust this computer? dialog.
-
Click Trust.
-
When prompted, unlock your iOS device.
Enable Developer Mode on iOS 16 or later
Starting with iOS 16, Apple requires you to enable Developer Mode to protect against malicious software. Enable Developer Mode before deploying to a device running iOS 16 or later.
-
Tap on Settings > Privacy & Security > Developer Mode.
-
Tap to toggle Developer Mode to On.
-
Tap Restart.
-
After the iOS device restarts, unlock your iOS device.
-
When the Turn on Developer Mode? dialog appears, tap Turn On.
The dialog explains that Developer Mode requires reducing the security of the iOS device.
-
Unlock your iOS device.
Enable developer code signing certificates
To deploy to a physical iOS device, you need to establish trust with your Mac and the iOS device. This requires you to load signed developer certificates to your iOS device. To sign an app in Xcode, you need to create a development provisioning profile.
Follow the Xcode signing flow to provision your project.
-
Open Xcode.
-
Sign in to Xcode with your Apple ID.
- Go to Xcode > *Settings…
- Click Accounts. . Click +. . Select Apple ID and click Continue. . When prompted, enter your Apple ID and Password. . Close the Settings dialog. Development and testing supports any Apple ID.
-
Go to File > Open…
You can also press Cmd + O.
-
Navigate to your Flutter project directory.
-
Open the default Xcode workspace in your project:
ios/Runner.xcworkspace. -
Select the physical iOS device you intend to deploy to in the device drop-down menu to the right of the run button.
It should appear under the iOS devices heading.
-
In the left navigation panel under Targets, select Runner.
-
In the Runner settings pane, click Signing & Capabilities.
-
Select All at the top.
-
Select Automatically manage signing.
-
Select a team from the Team dropdown menu.
Teams are created in the App Store Connect section of your Apple Developer Account page. If you have not created a team, you can choose a personal team.
The Team dropdown displays that option as Your Name (Personal Team).
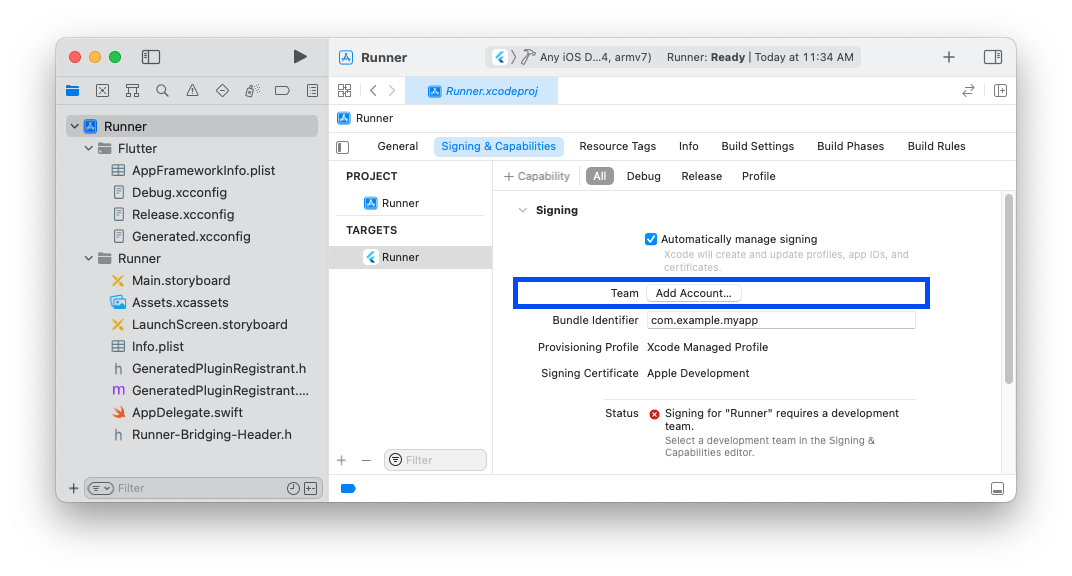
After you select a team, Xcode performs the following tasks:
- Creates and downloads a Development Certificate
- Registers your device with your account,
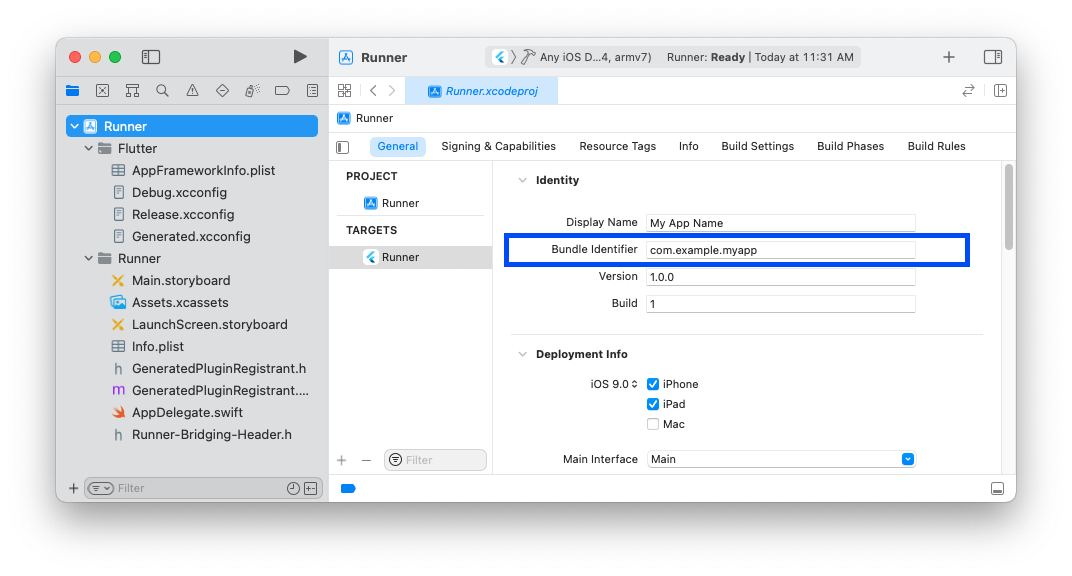
- Creates and downloads a provisioning profile if needed If automatic signing fails in Xcode, verify that the project’s General > Identity > Bundle Identifier value is unique.
Enable trust of your Mac and iOS device
When you attach your physical iOS device for the first time, enable trust for both your Mac and the Development Certificate on the iOS device.
You should enabled trust of your Mac on your iOS device when you attached the device to your Mac.
Enable developer certificate for your iOS devices
Enabling certificates varies in different versions of iOS.
-
Open the Settings app on the iOS device.
-
Tap on General > Profiles & Device Management.
-
Tap to toggle your Certificate to Enable
-
Open the Settings app on the iOS device.
-
Tap on General > VPN & Device Management.
-
Tap to toggle your Certificate to Enable.
-
Open the Settings app on the iOS device.
-
Tap on General > VPN & Device Management.
-
Under the Developer App heading, you should find your certificate.
-
Tap your Certificate.
-
Tap Trust “<certificate>“.
-
When the dialog displays, tap Trust.
If prompted, enter your Mac password into the codesign wants to access key… dialog and tap Always Allow.
Set up wireless debugging on your iOS device (Optional)
To debug your device using a Wi-Fi connection, follow this procedure.
-
Connect your iOS device to the same network as your macOS device.
-
Set a passcode for your iOS device.
-
Open Xcode.
-
Go to Window > Devices and Simulators.
You can also press Shift + Cmd + 2.
-
Select your iOS device.
-
Select Connect via Network.
-
Once the network icon appears next to the device name, unplug your iOS device from your Mac.
If you don’t see your device listed when using flutter run,
extend the timeout. The timeout defaults to 10 seconds.
To extend the timeout, change the value to an integer greater than 10.
flutter run --device-timeout 60
Install CocoaPods
If your apps depend on Flutter plugins with native macOS code, install CocoaPods. This program bundles various dependencies across Flutter and macOS code.
To install and set up CocoaPods, run the following commands:
-
Install
cocoapodsfollowing the CocoaPods install guide.$ sudo gem install cocoapods -
Launch your preferred text editor.
-
Open the Zsh environmental variable file
~/.zshenvin your text editor. -
Copy the following line and paste it at the end of your
~/.zshenvfile.export PATH=$HOME/.gem/bin:$PATH -
Save your
~/.zshenvfile. -
To apply this change, restart all open terminal sessions.
检查你的开发配置
运行 Flutter doctor
flutter doctor 指令将检查 macOS 完整的
Flutter 开发环境的所有组件。
-
Open 你的 Terminal.
打开你的 Terminal。
-
要检查所有组件的安装情况,请运行以下指令。
$ flutter doctor
由于你选择为 iOS 进行开发,因此不需要 所有 组件。如果你遵循本指南,指令结果应该类似于:
Running flutter doctor...
Doctor summary (to see all details, run flutter doctor -v):
[✓] Flutter (Channel stable, 3.19.0, on macOS A.B chipset, locale en)
[!] Android toolchain - develop for Android devices
[!] Chrome - develop for the web
[✓] Xcode - develop for iOS and macOS (Xcode 15)
[!] Android Studio (not installed)
[✓] VS Code (version 1.86)
[✓] Connected device (1 available)
[✓] Network resources

! Doctor found issues in 3 categories.
解决 Flutter doctor 的问题
当 flutter doctor 指令返回错误时,可能是 Flutter、VS Code、Xcode、连接的设备或者网络资源出错。
如果 flutter doctor 指令返回这些组件中的任何一个错误,请使用 verbose 标志再次运行。
$ flutter doctor -v
查看输出结果,了解可能需要安装的其他软件或者需要执行的其他任务。
如果你更改了 Flutter SDK 或其他相关组件的配置,请再次运行 flutter doctor 来检查安装。
管理 Flutter SDK
想要了解管理 Flutter SDK 安装的更多信息,请查阅以下内容。